Tuesday, February 15, 2011

About time...

Have you been checking out all the exciting happenings at Moxie Fab World?  Cath is celebrating the new Stamp It issue...pick one up if you haven't yet, it's great!...Now that life is slowly getting back to normal, I'm making time to get some challenges done, and there's one every day at the World. 
Monday's challenge is the Stamp It Techniques Stamping with Markers.  Now, you're not having deja'vu, I just had to include this card I made this week for the PTI anniversary, 'cause it's adorable...tooting my own horn...and it was made with markers!  I decided to break into my clear button stash and use them as tiles over the stamped image.  PTI's Damask border is the background, Each Damask image was colored with a marker then stamped on the Whisper White card stock.   I generally use this stamp set for shabby creations, but it was fun to make something outside my usual box.  I stamped the sentiment on a piece of window sheeting and placed it over the buttons so it would float over the pattern I made. 
Now, go on over to Moxie Fab World and participate in all the fun!

Monday, February 14, 2011

Be still...

my shabby heart!  Have you seen this week's challenge at the Play Date Cafe?  The colors, the inspiration photos and the DT samples are pulling at my shabby heart strings.  Just lovely...  Here is my quick creation for their challenge this week.  I made it with a new stamp set I received from my World Card Making Day win - all the winners are published in this month's Paper Crafts Magazine, did you git it yet?  I've got mine!

Joyeux Noel
Cardstock: (Very Vanilla) SU!

Patterned paper: (New Arrival – polkadot, doily) Peeples
Stamps… clear: (Joyeux Noel) Pink Paisley
Ink: (Soft Suede, Blush Blossom) SU!; Versamark; (tea ink) Tim Holtz Distress ink
Embossing powder: (Silver PEarl) Ranger
Accent: (glassline envelope) PTI
Fibers: (Hemp twine)
Tool: (zig zag cutter) Purple Cow; Distress tool

Finished size: 4 1/4" x 5 1/2"

Instructions
1. Cut card from Vanilla cardstock and distress with tea ink
2. Using Zigzag cutter to trim polkadot paper 4”x5.25”. Cut doily paper 3.75’x5” and distress the edges. Adhere to polkadot paper. Stamp sentiment along bottom edge.
3. Stamp tree image with Versamark on glassline envelope and heat emboss with Silver Pearl EP.
4. Stamp stars and postage mark on glassline envelope. Adhere to patterned paper.
5. Tie hemp twine around panels and adhere to card.

Cameo, oh Cameo...

Where for art thou Cameo?  Oh there you are! 
I have always LOVED cameos and those black silhouettes images you now can see, well everywhere.  I've wanted to get one of those made of my girls every time we're at Disney World.  They have this amazing artisan that hand cuts them out while you sit and watch.  It's really amazing.  So when I saw this stamp set from Kim Wilson Designs, I had to get it!
I made this for two things, first for the recent call for PaperCrafts Magazine...it didn't make it... and in case it didn't make it, I wanted to put it in the current challenge at Moxie Fab called Appearance of Cameos and the Waltzingmouse Sketch Challenge this week.  It's simple, and a little shabby.
Oh Cameo
Cardstock: (Going Grey, Basic Grey; Pink Pirouette) SU!

Other paper: (White Vellum) SU!
Stamps: (Paris) Kim Wilson Designs; (Polka-dot) SU! – retired can use PTI Polka-dot; (Damask – damask and sentiment) PTI
Ink: (Basic Grey, Going Grey, Whisper White) SU!; Versamark
Embossing powder: (Silver Pearl) Ranger; (winter white) SU!
Accent: (pink rhinestones) Kaiser Craft
Fibers: (white grosgrain); (pink seam binding) Snug Hug
Tool: (corner rounder) SU!

Finished size: 4 1/4" x 5 1/2"

Instructions
1. Cut card from Going Grey cardstock and gently ink the edges with ink. Stamp and emboss sentiment on bottom corner.
2. Cut 4.25”x3.75” panel of Basic Grey cardstock. Stamp damask with ink. Round one corner.
3. Adhere ribbon strips to Basic Grey panel and adhere to going grey card.
4. Stamp frame image on Going Grey cardstock with Basic Grey ink. Cut round image.
5. Stamp cameo image on Pink Pirouette cardstock and heat emboss with Winter White EP. Cut out to fit inside frame and adhere.
6. Adhere completed frame.

Saturday, February 12, 2011

I'm addicted...

Here I am in Detroit, still posting.  I think I may have an addiction...my husband seems to think so...  I'm checking all my computer 'work'...that's my word for it, to justify the time I spend here...before our day gets started.
Here is a creation I made on Thursday for this weeks challenge at Our Creative Corner and it just so happens to fit today's Papetrey Ink challenge!! ...lucky me!...  The challenge this week at the OCC, is to create a card with paper piecing or fussy cutting; and the challenge today at PTI is to imcorporate something MEGA in your creation.   Was I lucky or what to have added a mega size number to this weeks OCC challenge? ...perhaps I'm pshycic... 
Since the orginal challnege for this creation was paper piecing, this card is made ENTIRELY from items in my scraps box...except for the red card part...  The only item however on this that is PTI, is the button...hopefully it still qualifies for this challenge...  Had I not been using scraps, I would have used my Mat Stack #4 go-to die instead of the blue circle. 

The number is covered with pieces of patterned paper, and the red stitching is actually Hambly screen printed rub-ons.  This is a test run for Lily's 7th birthday.  I'm already planning her party...in April...a girls get-together of her friends in class...I know, I'm obsessive...  Anyhoo - I made this as a possible color combination for her party inspired by the Amy Butler multi colored print.  Pink, grey, red, sky blue..not on the paper, but I liked it... and lime green.  Fun, right?  It was a risky combination, but I really like it!

Friday, February 11, 2011

Shabby Sentiments

Well, I'm on my way out of town for the funeral.  The little one is napping and the older one isn't home for another hour, so I thought I'd post these while I had the time.
This is a card I created for the PTI Make it Monday challenge, but also for the Shabby Tea Room DT call.  It's not what I had in mind for the DT call, but with time running out before our trip, I decided to combine the two.  This is the inspiration photo The Shabby Tea Room provided.  Originally, I had wanted to make a patterned paper with my PTI Delightful Dahilas set...white embossed on pink pirouette paper...with doilies, and touches of black..you know, shabby style like I make...  If I get home early I'll do it.  Anyhoo, the PTI challenge is to make a simple card with assorted sentiment stamps.  I don't have a ton of PTI sentiments, so I had to improvise.  Nicole & Erin's samples were perfectly simple with adorable flourishes.  Here is mine, a little shabby, but simple.
The sentiments were embossed with black EP...well, except for the main one, obviously....  The heart was cut out of a doily I had and sprayed with Tattered Angels Vintage Pink shimmer spray.  And no, those aren't ghostly orbs floating around, I lightly sprayed the black paper to give it a pink shimmer, look:
Isn't that fun?  I really like adding the shimmer spray to my project when they're done.  It adds a bit of shabby softness to them.
So that's it!  If you're checking me out on Facebook, stop by my blog LilyBeth Boutique to see all the creative crafty things I'm up to!

Monday, February 7, 2011

Stress, sweets and cookies

Stress...how do you handle it?  Me, I'm an eater and baker.  Which is difficult, since I'm trying to loose another 40 lbs...  The last 2 weeks were stressful.  I baked about 10 dozen cookies...shortbread caramel bars, biscotti, italian easter cookies, million dollar peanut butter cookies, english toffee tea cakes... last week to distract me.  It was hard not to indulge.
First, my dear sweet hubby's grandmother took a turn for the worse.  She is 89 and has been taking care of herself pretty much on her own until last year.  We were able to visit her in Taylor, Michigan; give her love; and the girls decorated her room with a couple of drawings.  It was good to see her being taken good care of.  Sunday morning we got the call she had moved on to her Creator.  Dorothy was a quiet, kind and generous woman, and we were all blessed to have had her in our lives.
Also, my best friend Cristy...of 20 years...had a big surgery last Wednesday.  Thankfully, she has a great support system in place.  Cristy's hubby works for the railroad...which requires some crazy hours...so friends and family chipped in to help them out.   Her mom & dad took the kids for her, made sure they got to and from school and afternoon events.  Jodi & Margaret made sure the house was in order, dog was taken care of, and meals would be prepared for them for a few weeks.  Since I live 2 hours away and unable to help on a daily basis, I volunteered to stay with her in the hospital, ...so she wouldn't be alone...bring her cookies, and stayed with her the first night home since hubby had to work.  She's had some rough nights and problems with meds, but thankfully seems to be on the mend.
I have only been able to do a little bit of creating lately.  Here is a little box of cookies I made for my neighbor that was watching my girls for me one of the days I was gone.  It's just a little sample of the cookies I made and made it to match this card I made 2 weeks ago.  It's evident I'm obsessed with doilies, they've been in the last 4 projects I've made.  I'm subnitting this in the Cards Doily Challenge this week.

Finally, I have had SEVERAL requests for my recipe for the Pecan Caramel Sauce I have shared on this post and this one.  So here it is...it's an acient Chinese secret...it's really great 'cause it's made in the microwave!

Pecan Caramel Sauce
1 1/4 cups chopped pecans

7 Tablespoons butter (divided)
1 1/2 cups brown sugar
3 Tablespoons flour
3/4 cup light corn syrup
2/3 cup evaporated milk
Makes 3 cups of sauce.

1.Place chopped pecans in a microwave dish with 3 Tablespoons butter. Cook for 8 - 10 minutes, stirring twice. Watch the pecans closely to not burn them.  I use a pie dish.

2.  In another microwave safe bowl (I have a 8 cup glass measuring cup) place remaining butter and heat until melted. Whisk in brown sugar (the darker the better), flour, and light corn syrup until blended. Cook on high 6-8 minutes, stirring twice, until the sugar is dissolved.  Add in 2/3 cup (1/2 can) evaporated milk and the pecans, stir well.

3.  Store in sterilized jars.  Serve with ice cream, pound cake or pies (apple pie is yummy!).  Store in the fridge for up to 3-4 months.

Saturday, February 5, 2011

Happy Anniversary PTI!

 *read to the end for my favorite PTI creation*
*Clink*Clink*Clink*  Time for a toast....What a wonderful time to celebrate all that you are!  Unique, beautiful, quality...affordable...trendy and classic at the same time.  You surround yourself with talented, wonderful women, each with their own gifts to share and admire.  I love to visit you, see what you've been up to, and watch you grow.  You've been in my creative life now for over a year, and I'm so grateful to have you there.  You have expanded not only my resources, and my creative 'genius'...yes in quotes...you have also helped me blossom and express myself artistically every day! 
 Now, here's to you Papertrey Ink, as you continue the exciting journey you are on, I wish you years...and years, and years....of success, unwavering support from your family and fans, and the joy of watching your efforts expand the creative lives of others...as it has done mine.  So lift up your...imaginary...glasses and cheer for PTI*Ink*Ink*Ink*

If you couldn't tell, it's Papertrey Inks' 4th anniversary!  I know you know all about them, and those perfectly FABULOUS products they are able to produce every month.  I'd love to be fly on the wall during their brainstorming meetings and watch how they come up with all their amazing products...it would be easy, they are only 1 hour south of here... 
Every month at their reveals, I am amazed at what they have created and can't think of any way they can top it.  But everytime they do!  I have bookmarked every design team's blog and visit them nearly everyday.  They all provide me with wonderful inspiration.  I'm really excited about their new DT member Danielle Flanders, I can really relate to her design style - shabby, yet clean and cutesy, so Shabby-utesy!...yes I made up that word... The other great thing I love about their images is many of them are so beautiful to color or leave as an outline!  Like their Delightful Dahlias set...the only flower set I have right now, but my b-day is coming up... I can make beautiful flowers like this one with my copics...my new obsession....or keep the simple beauty of the outine for creations like this one...a winner from last week's Trigger Tuesday...or combine the two techniques for a wower like this...not to toot my own horn...
PTI is having a party over at their blog for this momentous occasion, and have asked us to post our favorite project we have made with their products to win and amazing prize!!!  I've had a really hard time picking one, as you can see with all the little photos over there on the left.  Many of those I have been honored to have grace the pages of PaperCrafts Magazine...thanks for the help PTI!...  My absolute FAVORITE creation I have made with PTI products and stamps has to be ...one I can't show you, it's getting published next month.... but this one is my second favorite!  It's the very first shabby creation I made, which made me a convert to the style...I hope I made Betsy and Melissa proud, as they have been my shabby inspirationista's...I gave this to my dad for Father's Day last year.

Simple Tree

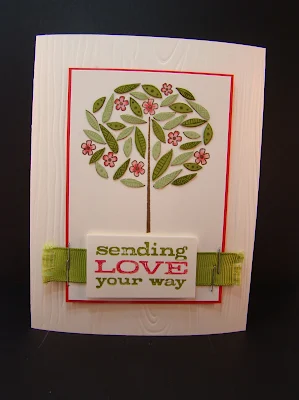
Hello again ladies...and gents... Here I am with another challenge at Our Creative Corner!  This week, our challenge is hosted by the lovely Lori Rider at the Diva Stamper.  Your challenge this week is to create a clean and simple card incorporating a tree or branching.  I really like making this type of card, they take me a while, but I really like the results! 
So here is my creation, it does have lots of fussy cutting, but the over all card is simple.  
To carry off the whole wood, branch theme, I use the PTI wood grain embossing plate on the card front behind the tree image.  I really love how this card came out!
Now go check out the other members of the OCC design team to get inspired to create your submission!

Wednesday, February 2, 2011

Holy Ice Batman!
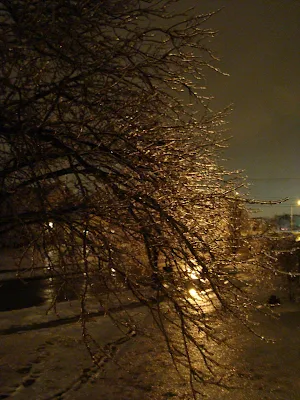
Yes, I live in the Midwest.  While we didn't get the snow that Chicago got, this is what Mother Nature gave us instead of the fluffy white stuff...
 It's not the best photo...it was really dark...but you get the jest of how much ice we got!...it was really quite beautiful...  The next morning, we had nearly an inch of ice.  Surprisingly, the main roads were drivable, but our street has yet to be salted.  As you can see below...
The rain came after the ice, and instead of melting the snow, it made the ice smooth and slick...kind of like a Zamboni...  It was a bit disconcerting, as I was to travel to Toledo Wednesday morning for my BFF's surgery.  I ending up having to wait only until later afternoon, and I made it here safe and sound - and Cristy had a successful procedure.  All's well that ends well!

Saturday, January 29, 2011

Today's the Day!

It's the first post for my new position on the design team at Our Creative Corner!  Have you visited us there recently?  We have a whole new look, and new creative challenges - perfect for those of you wanting to expand your creative minds.  This week's challenge is to create a 3D item for Valentine's day. 
I did more of an altered 3D item.  I had a few jars of caramel sauce left over from the holiday's so I made one up to give to my sweet 'adopted' mom since I'm crashing at her house this weekend.  I used a huge variety of items on this, SU!, PTI, American Crafts...it's a smorgasboard of fun...  There's a card, a gift bag and the jar of DELICIOUS caramel saucve.  I'll have to share this recipe with you...

Thursday, January 27, 2011

Jewel Inspiration

It's another card for the current Moxie Fab challenge.  This time it's the Jewel Tone challenge inspired by the Color Inspiration for Card Makers issue.  This crazy color combo was a struggle. 
I have all the colors in my paper arsenal, and even had a few new embellishments thanks to my WCMD win.  It took me a long time just to get this one card done.  Uggh...  At least its done now and I actually like how it came out!

Mono Inspiration

This is the last color challenge I'm doing for the current Moxie Fab Color Inspiration for Card Makers.  It's the monochromatic challenge that rings true to my heart...as the mom of 2 small girls...  We have all things pink here in my house and my paper crafting stash is no different. 
This card was simple to whip out, and I have a friend that just had a baby girl who will be the recipient of my current creation!
 Here is a closeup of the buggy.  I misted the card with Vintage Pink mist and really loved the effect!

Bold inspiration

Here is another card I created for the current challenges going on at Moxie Fab.  Have you been playing along too?  This card is for the Bold and Bright Color Inspiration challenge
I have to admit that this is a challenging combo for me.  I had so many different ideas, but nothing seemed very good.  I really don't like either one I made... This first creation is a re-make from another card I made from the original call. 


This second one I thought I'd make my own patterned paper with some pink Zing embossing powder I received from my Royalty win.  The effect on Pumpkin Pie paper is a bit eye crossing....

Neutral Inspiration

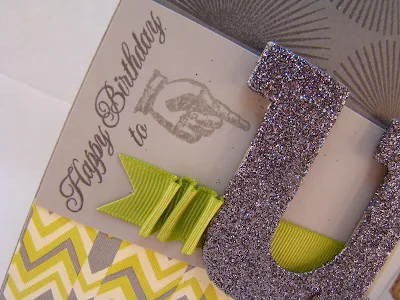
Here I am again, with another card inspired by the new Color Inspiration for Card Makers by Paper Crafts!  This one I have to say is one of my FAVORITE combinations.  Although, my Smoky sample didn't match the one Cath had up on Moxie Fab for this challenge, but I'm really ok with it.  I like her Smoky color much better.  This is for the Neutral Inspiration color group.

This card is a bit over kill...all the glitter...but I really like it.  Afterall, I am a glitter, girly-girl!


Metallic Inspiration

Have you picked up a copy of the new Paper Crafts Color Inspiration for Card Makers yet?  I have a few of my own creations gracing the pages of this special new edition!  Cath at Moxie Fab is hosting a few challenges based on some of the color combos featured in this magazine.  This is the first one I decided to tackle.
Pinkin,i Satin Wedding White and Metallic Gold.  I had a real hard time with this one when I was doing the call, but for some reason, it came pretty easy to me today.  My only problem was that my sewing maching is on the fritz...sob... and I had to add the ribbon to cover the holes left by my possesed Pfaff.  I can't give it too much grief, it is almost as old as I am!  Anyway, here's what I came up with;
I used Ranger Pearl Silver EP on the doily to give it the same shimmery look as the paper.  I love it!

Thanks for joining me today!!!  Don't forget, this Saturday is my first team post over at Our Creative Corner, come and join us!

Tuesday, January 25, 2011

Wow!

Thanks Cath!  She made me a winner on last weeks Trigger Tuesday with this card:

Isn't she sweet!  Thanks so much for honoring me!

Monday, January 24, 2011

Quick one

This is a quick little post.  I had started on this card over the weekend and set it aside because it wasn't working.  I just picked it up to make a quick card for Rob's Grandmother that just went back into the hospital.  I'm going to post it on the Moxie Fab Gray is the new Black challenge.

No school...

sick children and urgent care visits (3 in as many days) make Kristin a grumpy mommy.  'nuff said.

On to pretty things!  I made this first card earlier today, during the 40 minute non-existing nap my girls took.  I really like how it came out, so I think I'll submitt it to the Moxie Fab Gray is the New Black challenge that ends today.


This second card, I made over the weekend.  It's a fun card, and I used an old part of a card to whip it up in a few nimutes.  This also is for the challenge.

Saturday, January 22, 2011

And now....

EEKKK!!!  I had scheduled this for 1:00 pm Friday, and here it is, 1:00 am Saturday, and it didn't post!  Sorry here it is...

The winner of my Big News & BIG Giveaway contest!  Thank you to everyone that participated, including these lovely ladies that posted my giveaway on their own blogs:

http://scrappininak.wordpress.com/
Kelly - Uniquely Me
Deb - The Crafty Wizard
Lisa - This N' That
Brenda - Mama's Making

Many of you had 3 entries!
I wrote down everyone's entry, put them in a bowl and

had Lily pick the winner, and it is....Lisa M!  Congratulations Lisa and thank you to everyone that participated in my giveaway!  Not to worry though, in cleaning out my craftin' spot, I found lots of goodies I forgot I had.  Now, I have a huge box filled with some yummy goodies to give away over the next few months so stay tuned!

Friday, January 21, 2011

It's Gray...

Not just the weather here in Ohio, but my new favorite color!  I have been busy creating for the Moxie Fab Gray is the New Black challenge.  Here is my first creation, Ivory and Gray, fun and shabby.  I finally broke down and purchased the Hodpodge Hardware through SU!, and boy am I glad I did!  You will be seeing more of these gorgeous items I'm sure in later creations.

Shabby Thanks
Cardstock: Going Grey, Basic Grey (SU!)
Stamp sets:  French Script & Houndstooth (SU!); Daffodil Delight (sentiment - PTI)
Ink:  Going Grey, Basic Grey (SU!)
Ribbon:  Offray lace
Accessories:  Dress form (Hambly rub-on); Hodpodge Hardware (SU!); ivory buttons

It's So Pretty

Have you checked out this weeks' Moxie Fab Trigger Tuesday?

Oh, it's luscious...I love brown and grey together.  It's so chic and classic at the same time.  Like this dress ...the 3rd one in the photo montage...from my secret obsession show, The Fashion Show on Bravo.  The back is even prettier, but they don't show it on the website.  Anyway, I digress...
When I saw the inspiration photo I knew I had put the kleenex aside and get craftin!  I used the color palette for my inspiration on both, but the first one is more of a direct interpretation of the photo.

This was my first...and favorite of the two...creation this afternoon.  I really like the grey on the suede, very pretty! And now the second, and least successful creation
I don't think I like the the addition of the Sahara Sand to this card.  I may have to rework it later.

Achoo...

Ahhh....Sinus infection, bronchitis, phlem.  What my days are made of, as of late.  I spend yesterday morning at urgent care and the rest of the day in bed.  A whole day lost.  At least I'm 90% done with my crafting spot re-furbishment, I just need a trip to IKEA for some shelves and storage pieces.  That will have to wait a day or two, the roads are pretty bad.

Now onto one of my exciting announcements today! ...the other one will be later today...  I have joined my first design team!!!  I am SO very excited to be a part of Our Creative Corner's team.  They have a whole new team and a whole new look.  I missed being able to create something for this weeks challenge...you know, illness...but will have something to contribute to next week's post!  If you haven't been there in a while, come check us out!
On a housekeeping note...I will be announcing the winner of my giveaway later this afternoon!  Sorry to keep you waiting...

Wednesday, January 19, 2011

Where does the time go?

I can't believe that January is half over...so much to do...  Finish organizing my craftin' spot...yes, I'm on day 5...  magazine calls, challenges, clean my bathroom, send out PTO stuff; at least the laundry is washed, folded and put away...for now...  I did just get some very exciting news that I'll discuss with you on Friday, my giveaway is awarded that day too!  Make sure you enter here...

Here is a cute little project I did for the last PC call, it didn't make the cut, but I thought it was cute!  The theme of that call was 'girlfriends', and this card completely represents my BF Cristy and I.  Can you tell we're fun?


The Perfect Pair
Cardstock: (Daffodil Delight, Whisper White) SU!; (Waterberry) Bazzil

Patterned paper: (DeLovely Elements) Cosmo Cricket
Stamps…rubber, foam, clear: (Hangin’ Out) Taylored Expressions
Ink…dye, pigment, solvent, watermark, chalk: (Basic Black) SU!
Sticker: (Cintronella Drinks Grand Adhesion) K& Company
Fibers: (orange grosgrain) SU!
Embossing folders: (polka-dots) PTI

Finished size: 4 1/4" x 5 1/2"

Instructions
1. Cut and fold card. Emboss Daffodil Delight and adhere to card front. Cut strip of Waterberry and adhere to card front. Cut DeLovely element and adhere.
2. Add ribbon and sticker embellishments.
3. Stamp sentiment on Whisper White cardstock and adhere with foam dots.

Tuesday, January 18, 2011

Thick or Thin?

If you've been following for a while, you know I have been busy trying to loose weight.  Everyday is a struggle, I mean, if I was naturally thin, I wouldn't have to change my eating habits, would I?  I joined Jenny Craig in September and am now down 40 lbs...yea, only 40 more to go... and my girlfriend joined Nutrisystem 2 weeks later.  It's been a struggle for both of us these last 5 weeks, with the holidays and trying to get back on track.  We've been each other's supprt, so I thought this could be the perfect card for her...


Now, don't forget to enter in my giveaway!  The deets are HERE.
Thick and Thin
Cardstock: (Whisper White) SU!; (Soft Sky) SU! - retired

Patterned paper: (Rock Creek Gardens – The color of Memories) American Crafts
Stamps clear: (Family) Stampology; ( ) PTI
Ink…dye: (Soft Suede) SU!
Color media…markers: (yellow, green and brown) Copic; (Rose Red) SU!
Accent: (Diamonds, Pink) Stickles
Other: (tape measure)
Finished size: 4 1/4" x 5 1/2"

Instructions
1. Cut and fold card. Cut 2’ strip of patterned paper, adhere at bottom of card. Cut and adhere tape measure to card.
2. Stamp 2 women symbols. Stamp sentiment on separate cardstock, cut out and adhere to Soft Sky frame. Color in selected words. Attach with foam dots.
3. Ink cupcake stamp with markers and stamp. Cut out and embellish with Stickles. Attach with foam dot.

Monday, January 17, 2011

Wanna hang?

Who has a quirky sense of humor?  Well I can...sometimes...so I made this card to celebrate it!  How silly and fun is this?  Wouldn't it make a great invite for a small party with your best girlfriends.  I think I may have to whip up a few more and host a party myself...


Girls Hangin' Out
Cardstock: (Soft Sky) SU! – retired; (Barely Banana, Blushing Bride, Wild Wasabi) SU!

Patterned paper: (Spring – Growing Green) American Crafts; (Olivia & Oliver) Basic Grey
Stamps…rubber, foam, clear: (Hangin’ Out) Taylored Expressions; (Places Please, Place Card frame)PTI
Ink: (Basic Black, Soft Suede) SU!
Color media…markers; (red, yellow, green) COPIC
Accent: (teal buttons); (red rhinestone and white pearl)Kaiser Craft
Fibers: (white string); (hemp twine)
Dies; (place card die) PTI
Tool: (ticket corner punch) SU!
Finished size: 5x7

Instructions
1. Cut and fold card base. Cut cloud patterned paper to 4.5x6.5. Cut coordinating cardstock frame and adhere to card base. Set aside.
2. Tread buttons with hemp twine and adhere to card to create a clothesline.
3. Stamp and cut out 5 bra images. Adhere along clothesline.
4. Die cut place card and stamp frame image. Use ticket corner punch on the corners. Stamp sentiment and flower image. Color in flower with markers.
5. Adhere place card die to card with foam dots.

Saturday, January 15, 2011

Friend to Friend...

Hello, how are you?  My dear friend, I thought I would make you a little card.  It has a great little gift attached!  That cute little flower is removable, wear it in your hair, or on a cute blouse, perhaps on your purse?  The oportunities are endless.  I hope you enjoy it, I really liked making it for you!


Friend to friend
Cardstock: (Soft Sky) SU! – retired; (Whisper White) SU!

Patterned paper: (Savor – Kitchen Medley) Little Yellow Bicyle
Stamps; (Teeny Tiney Wishes) SU!
Ink; (Soft Suede) SU!
Accent: (red button)
Fibers: (white felt and green satin fabric) ; (white thread) ; (yellow polkadot ribbon)
Font: (name) website or source
Dies: (hot air ballon, leaf) PTI
Tool: (sewing machine) PFAFF; (corner rounder) SU!

Instructions
1. Cut and make card. Cut patterned paper and attach to card base. Run a stitch along pattern. Set aside.
2. Die cut 6 balloon shapes from felt. Using fabric glue, fold each in half and pinch at the bottom. Trim the basket off each petal and assemble in a flower shape. Attach a hair clip.
3. Die cut leaf from green satin and adhere to the back of the flower.
4. Adhere the ends of a strip of ribbon to the inside of the card along the patterned paper. Attach embellishment to the strip of ribbon.

Designer Tips
• Attach a hair clip to the back of your handmade embellishment and clip to a strip of ribbon on the card.

Fall leaves with ALTENEW's Cozy Comfort Retreat!

 Fall leaves with ALTENEW's Cozy Comfort Retreat! Hi all! We are back with another challenge for the Sisterhood of Crafters !  This time...