Thursday, May 18, 2023

AAAGGGHHH! - JUGS CHIC OF THE WEEK WINNER! - THE COLOR CHALLENGE SHOUT OUT! - THE FLOWER CHALLENGE HONORABLE MENTION!

 Hello all,

I'm working on product projects for Altenew; the die, sentiment and the background panel are all new products being launched on July 1st!   This card is my first sneak peek and I will post a new project each week until the final launch on July 1st.  I am even launching my YouTube channel these next few weeks so stay tuned for the links for those videos!  Its really all very exciting for me....

NOW..to the card on hand...I have made MANY, MANY projects with these items...BUT...for some reason...THIS one...oh lordy be...  Have you ever had one of the cards where you worked hard and then EVERYTHING started going wrong?!?!  I can't be the only one....THIS CARD HAS BEEN THE BANE OF MY EXISTANCE TODAY!!!


I CAN NOT blame the lily dies, because they are absolutely lovely and go together perfectly with the layers.  Really, they go together like a dream!  My insistence on attempting to make realistic stargazer lilies...when I am not the glorious Jaycee Gaspar...AND THE FINISHING OF THE CARD???....gave me a run for my money today I'm tellin' ya...  It has made me bring out my southern drawl!

After I did the ink shading for the lilies, I layered them and used the ever handy press and seal paper to get perfect placement.  I wasn't thrilled with my shading but wasn't too disappointed.  I then made 3 different backgrounds, debating which to use and settled for this one.  After that is when it went down hill....FAST!

The flowers were placed on the background panel...crooked, and when I peeled off the press and seal, it peeled off some of the edge of a flower! UGGH, but not the end of the world... Next issue? The splatters from my spray wouldn't splatter, and when they FINALLY did, they went all WACK-A-DOODLE... Ok...it's ok, not great, but...ok.  THEN...the die cut sentiment would NOT go on straight and started bending...damn old lady vision and caffeine shaky fingers...I had to give up on the letter 'r' for my sanity.  Finally, when I stamped the other part of the sentiment, I had to do it 3x because the tail end of it was crooked, then I cut it crooked!!!  I had to just finish it as best I could at that point so I could have a sense of some type of accomplishment!!!

So there it is...the overall image is lovely, but my craftmanship leaves a LOT to be desired.  Although I had issues today, I have been SO INCREDIBLY blessed and honored to be a part of this product launch and am EXCITED to show you all the things I have been working on with these fantastic items!  I am also submitting these to the JUGS #679 Wedding challenge, the Color Throwdown Challenge #743 of pink, lime green and white and The Flower Challenge #80 pastel flowers.

Wedding season

 Hello all!

Did you know I spent over 15 years as a florist/event designer?  Yup.  We did weddings, parties and corporate events, I've even traveled internationally to produce events.  I loved the creating, the coordination and the looks on peoples faces as they entered a room we had completed.  It was an incredibly challenging but rewarding job! 

I have been in pre-release mode for Altenew (more on that at a later date) and decided to set that aside for the day and work on some challenges.  Since wedding season is upon us, and we have a couple to go to this summer, the JUGS Challenge #679 helped me get started on my cards for the showers and wedding.  I adored this one from the design team, and this lovely one reminded me of the technique I used today.

This was a REALLY simple card to create, and I even used some left over shimmer blush paper from my own wedding 8 years ago.  Appropriate for this I felt.

I started with Altenew's Engraved Motifs embossing folder and inked the negative side with some gold pigment ink.  After the paper was embossed, using an ink blending brush, I added some Pink Pearl to the centers of the flowers.

The sentiment from Altenew's Leaf Canopy was stamped and embossed with gold on vellum to keep the over all look soft and pretty.  The gems have been sitting in my gem box for eons and had to see the light of day.

Thanks for visiting and have a colorful day!!

Thursday, May 11, 2023

Struggle bus part 2...

 Hi all,

Here is that other card I struggled with for the Color Throwdown challenge this week, orange, aqua, lilac and black.  This did NOT work for me but I thought I'd share it anyway.  I'm also entering this into the Happy Little Stampers Die Challenge as well as the Addicted to Stamps and More challenge this week, dies or stencils.


The dies I used were Altenew's Layered Snowflake A and Script Words dies.  The result is....eye crossing... to say the least!


Since I really don't like it, I won't go into details.  I'm sure I'll find someone to give it to!

Ridin' the Struggle Bus - CTD SHOUT OUT & AYST TOP PICK!

 Hi all!

Have you ever had a project you just can't see to get your head around?  That was today and my attempt to complete a few challenges.  I guess that's why the call them challenges, eh?  If they weren't difficult they's be called cake walks....

I decided to join the Color Throwdown this week and their crazy color story of orange, aqua, lilac and black.  Not at ALL inside my comfort zone, so I thought I'd give it a try.  I TRIED to make 3 different cards for this challenge.  I was able to complete 2, and scrapped the third. This is the last card I made for this challenge.


After my first 2 attempts this morning, I spent the day thinking how to go about it and came up with the Altenew's Starlight Die Set. This is a new die so I'm also entering this card in the As You See It Challenge 'My most recent addition to my craft stash...', as well as the Happy Little Stampers Die Challenge and another for the Addicted to Stamps and More die cuts and stencils challenge This is a labor intensive card, LOADS of die cuts and paper piecing.  It takes a ton of patience for this type of card.

I started by die cutting the shape 6 times out of black, black glitter, white, aqua, lilac and orange cardstocks.  For the white and black papers, I removed the negative pieces and set them aside.  The colored die cuts, I immediately place a piece of Press n Seal wrap on the die cuts to keep them organized to the future placing.


I started with the white die cut on the black card base and attached the negative colored pieces in the white die cut.  I then layered all the remaining die cuts by using spray adhesive (way easier than with a glue pen) and put them together.  The assembled stack was then placed on the card base to cover the white die cut.  The star cut from the black cardstock was placed to frame the intricate work and a sentiment from Altenew Sentiment Strips was stamped and embossed with white detail powder and added to the center.

Do I like it?  Well...not really my aesthetic, but I appreciate the time and effort that went into it.

Have a colorful day!

Wednesday, May 10, 2023

Greenbrier Duo - FMS 585 DESIGN TEAM SHOUT OUT

  Hi all!

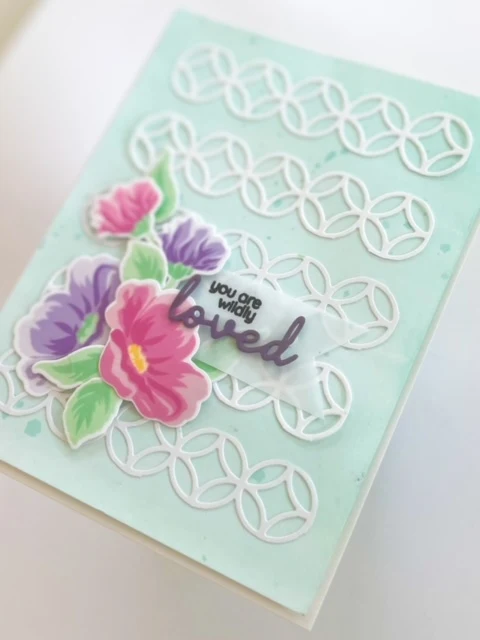
Just a quick card using the inspiration from the Freshly Made Sketches and the Flower Challenge.  The sketch was the launching point, and the pastel colors were inspired by The Greenbrier Resort in West Virginia.  One of our ALL TIME favorite places to go to!

The room that inspired this card it called the Trellis Room.  Its filled with mint green, hot pink, lavender and dark green. Sounds scary eh?  Dorthy Draper was a GENIUS when it came to color combos and decor, so I look to her for inspiration not only for my creations but even in my own home!  (My children refer to our decor as circus chic).


I started with the background color for this card, just like the Trellis room, I had to use Altenew's Minty Mint ink for the color to match the wall color. Next, I used the background die cut came from Altenew's Circle Quilt Cover die to correlate with the Freshly Made Sketches design for this week. I trimmed the circles into a strip for the panels in the sketch.  

The beautiful flowers come from Altenew's Wildy Loved mini stamp set.  Who knew so much detail and fun could come from a mini set??  It's amazing what they do...

I made the flower in both pink and purple using Altenew Shade of Purple Cherry Blossom  and Green Meadows ink sets.  The layers are wonderful and such an easy and impactful set for being a mini set! The die cut 'loved' also comes from this set and is cut from an old SU! color, Perfectly Plum if I remember correctly?

I guess that's it!

Have a colorful week!

Monday, May 8, 2023

Hibiscus Birthday - CHALLENGE WINNER!

 Hello all!

I've been blessed to have been able to spend part of the day in the studio.  I love lazy days....tomorrow I will be focusing on yard work...boo...


I decided to create this card for the Beautiful Blossoms Challenge blog with this image as the inspiration.  THe image has tropical flowers, so I grabbed my Altenew Hibisucs 3D die set to create this card. 


I used watercolor paints from Altenew with Puffy heart and Midnight Iris and mixed them together to create a verigated swatch of color.  I die cut my 2 flower pieces from that then repeated the same thing with Evergreen, Forest Glades and Bamboo paints.

For the background I painted Lagoon and splattered some on as well, then covered it with the Altenew Plaid Builders B die trimmed down to a small square.


Its been finished off with the Altenew Label Love stamp set for the Happy Birthday sentiment.

Wax seals CAS

 Hello all!

A quick creation here.  I'm trying to embrace the CAS card asthetic, so I'm continuing to participate in as many challenges as I can until it gets easier for me.


These cards I decided to do when I saw the color story they presented at CAS Colors and Sketches.  I don't have the updated SU! papers (I think I last purchased them when I was a demonstrator in 2010) so I used inks, die cuts and my new wax seals to make them.  I used a watercolor technique so the colors would be soft and muted to fit into the Flower Challenge as well this round.


I started with a watercolor ivory paper I have a plethora of...they are actually postcards you can paint on and mail!  100 to a pack, I got them for my art students as a gift for participating in a scavenger hunt at the Toledo Museum of Art a few weeks back.  I always buy more than I need, but they get used one way or another, so I'm not worried.  The paper has a natural texture to them, but work well with watercolors.  

I started by adding a water puddle to the paper, then tapped my brush into ink rubbed onto my work surface and tapped the puddle to send the pigment around.  The pink background one uses Altenew Pink Pearl, while the blue background uses Altenew's Desert Night and Volcano Lake inks.  

I created the card base and added the watercolor panel to them, then die cut the flower stems from Shein...they're not great dies, but they do the trick.

The wax seals I still need to work on my quickness with them...who knew they're so finicky? I combined the 2 blue colors for the pink card and 2 pink color waxes for the blue card. Each was stamped with the sentiment, then highlighted with a gold Sharpie marker.

They were both really quick and easy, hence making 2!

I hope you're having a colorful day!

Sunday, May 7, 2023

JUGS of Lemonade

 Hi all!


I just had to participate today with the JUGS color challenge #678.  Pink and yellow remind me of summer and pink or strawberry lemonade...and I'm a southern girl at heart so I'm a SUCKER for lemonade!


I am sorry again for the photos...I really need to take them during the day or invest in some good indoor lighting for my photos...They've come across as orange and pink...

I started with the watercolor paper.  I have lots of old re-inkers from my days with Stampin Up! so I used the Pretty in Pink re-inker and some pigment yellow powder on the paper.  I have been playing with the pigment powders lately, they're lots of fun but seriously messy!   I splashed those colors around on the paper, then lightly tapped it with a baby wipe to help give variation to the background.  After it dried, I used Altenew Puffy Heart and Fresh Lemon watercolor paints to add my splatters to the background.


Next, I pulled out The Greetery Slices die set, because I really do have a lemon obsession.  I think I have 3 lemon stamp sets and 2 die cut sets...and my kitchen is yellow and navy blue...with lemons...  I cut white cardstock and vellum paper to make my lemon slices, and I added Altenew Fresh Lemon and Pinkalicous inks to the vellum paper to give the slices a little color.  I have a small collection of jar PET stickers, so I thought I'd use that to ground out my arrangement.  I like that it adds a little shine to this, just like a jar!


The strip of patterned paper was cut from an old PTI bookmark die I have and in my scrap container, I found some luscious pink seam binding ribbon I used to use ALL THE TIME.  Its so beautiful and feminine...I couldn't resist using it.  The yellow bakers twine finishes off the bow perfectly.  I added the sentiment from Altenew's Main Squeeze set then finished with the sequin sparkles to complete the project!

I hope you've had a colorful day!!

Saturday, May 6, 2023

Monochrome stencil fun - CHALLENGE WINNER - Little Red Wagon

 Hi all!

Trying out watercolors with my stencils today.  I started with powdered watercolor pigments, but that went VERY astray, so I resorted to the old fashioned way.

 I was inspired by the Addicted to CAS challenge this week with the monochrome colors as well as the Addicted to Stamps and More challenge to use stencils and dies and thought I'd give the Little Red Wagon challenge blog a try this week as well.  

I like how it came out even if it gave me a run for my money today...  I love the stencil from Altenew, which I haven't used before so I thought I'd give it a run today.  The die cut is an old one from PTI, to be honest, difficult to get out of the die, but it's easily 10 years old and they've gotten better at making dies since then.  I actually have an order coming in from BOTH of these amazing companies this next week, I'm excited to receive them!


Have a colorful day!

Friday, May 5, 2023

Dots, stripes and peonies

 Hi all!

I'm SO ready for nice weather!  In Ohio we have 2nd and 3rd winters lasting until about May, sometimes we even get snow!  Today has been lovely and I'm hoping it continues to stay this way...fingers crossed.

After a whirlwind last 10 days helping out my 'protégé' at my old job (aprox 130 hrs), I'm finally able to find some time for my self in the studio. I'm participating in the Altenew May Inspiration Challenge hosted by the uber talented Jaycee Gaspar.  He is just...amazing.  Coloring and shading? CHECK!  Design and layout? CHECK!  Color and out of the box thinking? CHECK! CHECK! CHECK!  Amazeballs...

I mean...come on...really.  Have you seen anything else more exquisite? ALL of his work is of this caliber.  I still need to invest in some great alcohol markers, but I have pencils on the way so I can work on his techniques.  I am inspired!  I am also combining this with the Inkspirational challenge this week, Stripes and Dots. 

I started with stamping the image with Vanilla Cream ink using the Altenew Billowing Peonies bundle. It kept the image looking like a watercolor after using the stencils as the lines didn't show up hardly at all.  It's such a pretty set, I used the smaller of the 2 flower stamps with coordinating stencil using the Tropical Forest ink color group for the leaves and Rose Petal ink color group for the flowers, finishing the centers with the Warm and Cozy ink color group for the centers.

For the background, I used the Altenew Buffalo Plaid builder stencil with Orange Cream ink for my stripes and the dots were created with an old shimmer spray I had on hand and with gold metallic watercolor paint.  The sentiment is from the stamp set, which I stamped, embossed with gold embossing powder (I need to get some new stuff...it seems...off?) and die cut.  I finished off with a little sparkle from the sequins around the sentiment and the flowers.
Overall, I like the card...I think perhaps I should have used a darker ink for the stamp so the details would be more prominent.  I may try again with the larger stamp next time...

Have a colorful day!