Sunday, March 27, 2011

It’s over…

My vacation from life. Leaving my parents, my support. We are getting ready to jump back on a plane and back to reality….*tear*…It’s always hard to leave. We had lots of fun, the girls enjoyed their grandparents. Playing at the park, swimming in the pool. Rob enjoyed his spring training games, getting his autographs and hub-nubbing with the players. I just loved spending time with mom & dad, helping with the house plans, and general togetherness. It was all wonderful. This card perfectly represents how I’m feeling. I should have brought it along on the trip to give my parents. I’ll just have to send it to them when I get back…to grey skies…

Time Flies
Cardstock: (110 lb white card stock)
Patterned paper: (Urban Prairie, Hopscotch) Basic Grey
Stamps clear: (Time Flies) Studio Calico
Ink dye: (Basic Black, Daffodil Delight, Old Olive, Baha Breeze) SU!; (Craft White) SU!
Embossing powder: (Winter White) SU!
Accent: (Vintage Pink & Granite Shimmer Spray) Tattered Angels
Fibers: (pink) Snug Hug; (white thread) Coats & Cutter
Tool: (Corner rounder) SU!; (sewing machine) PFAFF
Finished size: 3 1/3” x 6.5’

Instructions
1. Cut card and fold.
2. Spray ribbon with Vintage Pink shimmer spray. Tie ribbon around card.
3. Cut patterned paper 6.25x1.25’, stitch onto card.
4. Cut 1.5” squares from assorted ‘solid’ papers from collection. Stamp clock images in coordinating inks. Round corners.
5. Stamp hands on clocks with Craft White ink. Emboss with Winter White EP. Adhere to card.
6. Lightly Spray card with Granite shimmer spray.

Designer Tips (if applicable)
• Lightly spray finished card with shimmer spray for a touch of shabby shine.
• Leave particles of EP on your stamped image when you heat emboss for a shabby touch.

Saturday, March 26, 2011

ATC or Baseball


Did you know that ATC cards are the same size as a baseball card? I didn’t. I bet your wondering why I’m bring this up. Well, for 2 reasons.

First, let me explain the baseball card reference. My hubby is a baseball fan…more like maniac… He has been collecting baseball cards since he was a kid. To tell him I was pregnant with our first daughter, I bought him special baseball cards to soften the blow…I wasn’t sure how he would take it… Part of the reason we are in Bradenton Florida instead of Orlando, is because they have Spring Training games…everywhere… His collection of baseball cards is outrageous. Over 1 million…he’s been at it a LONG time…he gets them signed, he has us get the big name players…they like kids and ladies with big ta-ta’s…like Brady Sizemore, Evan Longorria, Darryl Strawberry, even Reggie Jackson and George Steinbrenner.

Why am I bringing this up? Because, ATC’s are the challenge this week at Our Creative Corner! When I told Rebecca I didn’t know anything about ATC’s she told me it was the same size as a baseball card – something I could obviously relate to. Rebecca challenges us to make an ATC card using kraft, ivory, chocolate and a color of your choice. I have NEVER done an ATC card before…shocking, I know…I just never understood them. What do you use them for? Are they to trade or collect? It really boggled my mind. So when Rebecca posted this challenge, I thought, “Really? People actually make these?” Still, I decided to head into it full force, and admittedly, I really liked making this! Now I have to say, that I made it Sunday night, at 10 p.m. ...I had to since I had spent the week acting like Nurse Betty to my family and had NO time to create…we were leaving for our trip at 5:30 a.m. Monday. It came together really quickly…that’s why I like them… I used some blog candy I won from Clean & Simple Stamps…I’ve been so lucky lately, I should get some lotto tickets… They sent me the most adorable stamps and dies, Spring ( ) and GORGEOUS buttons, and Scortape and brads. I love these boots! I wish I could have a pair…my feet are too big…so I’ will live vicariously through my children and this stamp set.  I took these photos with my new Thunderbolt phone...it's so cool...but it didn't catch the shine from the clear embossed puddle.

Friday, March 25, 2011

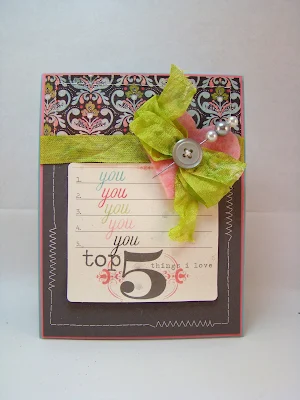
Top 5

Isn’t this sweet? I love the tag I used, it’s from Little Yellow Bicycle. It’s really for scrapbooking, but I thought it worked well here. This was also not accepted for the Go-To-Sketches call last month. Oh well, I have the perfect person to give it to…

Top Five
Cardstock: (Baha Breeze, Regal Rose, Basic Grey) SU!
Patterned paper: (Oliver & Olivia) Basic Grey
Other paper: (tag) Little Yellow Bicycle
Stamps…rubber, foam, clear: (Up, Up & Away) PTI
Ink dye: (Baha Breeze, Regal Rose, Pretty in Pink, Certainly Celery, Basic Gray) SU!
Accent: (Granite & Key Lime Shimmer Spray) Tattered Angels, (grey button)
Fibers: (White) Snug Hug, (pink felt); (white thread) Cutter & Coats
Dies, embossing folders, brass templates: (polkadots impression plate) PTI
Tool: (sewing machine) PFAFF
Other: (pin)
Finished size: 4 ¼” x 5 ½”
Instructions
1. Cut and fold card. Set aside
2. Cut Regal Rose panel to 4 1/8” x 5 3/8”. Cut Basic Gray 4x3.5”, emboss and adhere to panel. Cut patterned paper 2x4”, adhere to panel. Stitch around edge.
3. Spray ribbon with Key Lime shimmer spray. Wrap seam ribbon around card and adhere panel to card base.
4. Ink ‘you’ and stamp on lines of tag in varying colors. Adhere to card
5. Embellish with ribbon, felt heart, button and pin.
6. Lightly spray finished card with Granite shimmer spray.
Designer Tips (if applicable)
Lightly spray finished card with shimmer spray for a touch of shabby shine.

Thursday, March 24, 2011

You are…

Just Lovely! Yes you, all my bleeps out there…you know who you are…I really appreciate that you take time from your busy days to visit my little spot here on the web. I hope it brings you some joy…I know I have fun with it…and some inspiration. Enjoy life and remember, that you are Just Lovely.

Just Lovely
Cardstock: (Basic Black, Pumpkin Pie) SU!
Patterned paper: (Urban Prairie) Basic Grey
Stamps clear: (Union Square Perfect, Lost & Found) My Minds Eye
Ink dye: (Basic Black) SU!
Accents: (green rhinestones)
Fibers: (white pom-pom)
Tool: (Upper Crest Border Punch) Friskars
Finished size: 4 1/4" x 5 1/2"

Instructions
1. Cut card and fold. Place corner of card at a 45 degree angle into the border punch and punch. Repeat with opposite corner.
2. Cut first patterned paper 2x4”, using the border punch, punch the corner to match card base. Adhere to card.
3. Cut second patterned paper 3.5x4”, using the border punch, punch the corner to match card base. Adhere to card.
4. Stamp sentiment. Make brackets with border punch, adhere to frame sentiment.
5. Embellish with pom-pom trim and rhinestones

Designer Tips;
• Use a border punch to embellish the corners of your card by placing your card at a 45 degree angle.
• Use a border punch to create your own brackets. Punch cardstock, move 1/8” and punch again.

Wednesday, March 23, 2011

Love’n Hopscotch

The new Basic Grey papers that is. I received them as blog candy from Cards magazines blog-site Create. It was tons of fun to use them for the Go-To Sketches Paper Crafts Call…even if it didn’t get in…I love how the patterns all go together, so much fun!
Love You
Cardstock: (Whisper White) SU!
Patterned paper: (Hopscotch Collection: Skip to my lou, Monkey Bars, 4 Square, Skipping) Basic Grey
Other paper: (heart doily)
Stamp rubber: (Sweet Saying) SU!
Ink dye: (Soft Suede) SU!
Paint: (White) Darice
Accent: (assorted buttons)
Sticker: (heart, Hopscotch) Basic Grey
Fibers: (white thread) Cutter & Coats, (white embroidery floss) DMC
Tool: (sewing machine) PFAFF
Finished size: 5x5
Instructions
1. Cut card and fold.
2. Cut patterned papers to fit sketch and sew onto card. Paint edges with white paint.
3. Cut ‘you’ from patterned paper. Sew with embroidery floss along letters.
4. Stamp ‘love’ and adhere ‘you’ panel below. Cut heart from doily and adhere next to panel.
5. Embellish with buttons and heart stickers.

Tuesday, March 22, 2011

Hoo’s ready for Halloween?

I mean really, summer isn’t even here! But that’s how it rolls in the land of glossy magazines. The last call for Paper Crafts focused on Halloween…it was difficult to get in the mood… I had so many ideas for it, but alas, the flu, strep and ear infection bugs had other plans for my time. This was the only card I had time to get done...finished the first day of the call… I really love her! Isn’t she just adorable? I was so disappointed she didn’t get picked, but that’s how the cookie crumbles. When you partake in the submission process, you have to get a thick skin. Even if your creation is wonderful…as this little owl chick is…it just might not fit in the plans of the issue they have. Don’t ever give up on it. Dust yourself off, puck up the glue runner and start again! What to do with the rejects? Get yourself an ETSY account and start pondering your wares. You’ll be surprised what your buyers want!

Halloween Hoo

Monday, March 21, 2011

Another Reject

Greetings from sunny Florida! We are here…like every other Midwest spring break family…for fun in the sun. We aren’t visiting our favorite Disney this time, but spending time with Mimi & Bopie…my parents…in Bradenton, playing in the pool, going to spring training games and general all-around relaxing. Since I’m not at home, I thought I’d share some of the rejects from some magazine calls I have.

This one is from the Go-To-Sketches call Paper Crafts had a few weeks ago. The circles are all stamped and heat embossed on White Metallic Shimmer paper, then I used the resist technique to have them match the Baha Breeze background. It’s cute and shimmery in person…take my word for it…

Happy Anniversary
Cardstock: (Baha Breese) SU!; (Metallic Shimmer White) Papers & More
Stamps clear: (Damask & Guide Lines Two) PTI
Ink: (Craft White) SU!; (Baha Breeze) SU!
Embossing powder: (Embossing Pearls Silver) Ranger
Accent: (white pearls) Kaiser Kraft; (large white ½ pearls, Pretties Kit) SU!
Tool: (1/2”, ¾’, 1”, 1 3/8” circle punches) SU!; (Upper Crest Border Punch) Friskars
Finished size: 4 ¼” x 5 ½”
Instructions
1. Cut Baha Breeze 4x11” and fold card.
2. Stamp assorted images from both stamp sets with Craft White ink on Metalic Shimmer paper. Heat emboss with Embossing Pearls Silver EP.
3. Punch out images with assorted circle punches. Use emboss resist technique by inking each circle with Baha Breeze ink.
4. Adhere circles and pearls.
5. Stamp sentiment with Craft White ink on Baha Breeze paper. Heat emboss with Embossing Pearls Silver EP. Border punch edge. Adhere to card with ¼” overhang.

Saturday, March 19, 2011

Recycled DoodlePantry

Hi Ladies!
What a VERY crazy week...I'm exhausted...packing for our spring break trip, planning the schools' spring parties, 1 kid with strep throat, 1 kid with a fever, 1 sick hubby with a sinus infection and ear drum issues.  It's not surprising I didn't get much time in my craftin' spot.

I did however find time to create for this week's Our Creative Challenge, recycle a container in some way.  This week, the challenge is hosted Rebecca and is sponsored by DoodlePantry Digi Stamps!  I have to admit, this is the first time I have ever used anything digi...I think I may be hooked...  I've always presumed I needed a big, expensive photo program.  Not the case here!  I was able to use them with Microsoft Word...enlarge, reduce, impose...super easy peezy! 

Because of my recent addiction to my Skinny Caramel Lattes, I have several of these containers laying around, just for this challenge. 

Here is the reason I think I may be addicted to digi stamps, I printed out all the papers...so adorable... on white card stock.  AND I could do it again...and again, and again...make them bigger or smaller.  They're so versatile!  I enlarged the blue gingham, reduced the red gingham, and imposed the strawberry image on top of it so I could fussy cut it.  The leaves I colored in with my Copics...not very well I might add...  I also added the sentiment...included in the digi kit...over the yellow gingham and die cut it with the adorable Spellbinders Ribbon Tags Trio Three frame I recently received.  I paired it with my favorite coffee cup, nice, heavy, and holds a lot. 

Alright, now go and recycle something fabulous then post it up on the OCC challenge.  Need some inspiration?  Check out the rest of the design teams creations here.

Tuesday, March 15, 2011

Cards and Gifts

It's out!  The newest special issue from Paper Crafts, 350 Cards and Gifts.  It's SO fabulous, I just got mine in the mail, and it is oh-so-good...  I am proud to say of the 7 items I submitted,  they accepted 6 items of them for the issue!  I did a happy tap dance when I recieved the e-mail, it's such an honor.  This is one of my  item gracing the pages, Just a Note Card Set.

This one is in the Card Sets section...This photo doesn't look as nice as the one in the magazine...  There were so many great card sets in this section, after seeing all that's in there, I am even more honored!  I'll post the rest of the pieces in the next few days, including my FAVORITE item...on page 101 if you pick up the issue...

Saturday, March 12, 2011

EEEKKK!!!

I compleely forgot to post my creation for this weeks OCC challenge!...and I'm the hostess, pitiful....  My BFF's are arriving in 10 minutes for a birthday celebration so this is going to be quick...

This a Fabulous Fabric challenge, so you need to incorporate fabric in some way - other than ribbon! 

First, I need to bring your attention to the die cut with my sentiment on it.  Is it not fantastic?  It's new...Ribbon Tags Trio Three, a gift from the lovely Terre and Stacy at Spellbinders!!!  I recieved a happy little e-mail about a week ago from them.  They like my creations and sent me some FABULOUS dies for me to use!!  How awesome is that?  It really valitifies my obsession with my hobby...are you listening hubby?...  Someone really likes my creations!  It just goes to show you, you NEVER know who's watching, waiting for an opportunity to shine some goodness on you!...besides the big guy upstairs...   THANK YOU LADIES & SPELLBINDERS!!!
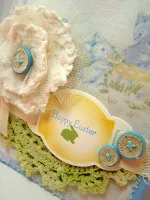
I used a piece of scrap fabric for the background...isn't it cute?... and made my flower with scraps of chenille and ivory tulle.  Even the buttons have my favorite fabric on them, burlap!  Those are from my WCMD win...thanks PC...

Wednesday, March 9, 2011

Winner Chosen & loser showcased

Well, not really a loser...I like it...  This is another card I made for the Paper Crafts Sketch Call. 
It was a pretty expected creation for the sketch, but I do like how it came out.
Now ~ the moment you've been waiting for the Winner for my Simple Shabby Blog Candy! ...sorry it's a few days late... I've used the random number generator this time...my usual winner picker is at school...and the winner is:

True Random Number Generator

Min: 1
Max: 10
Result: 8
Powered by RANDOM.ORG

Nancy said...

Congratulations on being publishe! I just found you while hopping through the TE blog hop - I swore I would comment on every entry this time and when I got here I started looking around your blog. I just became a follower because I LOVE all your projects! (I actually became a follower BEFORE I noticed that you have blog candy - lol)  I love your style including your terrific bows, buttons and doilies.  Do you make the crocheted doilies? If so, do you sell them? :)  Have a great day!
February 24, 2011 3:56 PM

Congrats Nancy!  I'll contact you for all your deets.
 

Monday, March 7, 2011

Lucky...

Did you hear about the amount of submissions for the last Paper Crafts Magazine Go-To-Sketches call?  Over 2750 entries!  I did 10 submissions, and was lucky to have 1 accepted ....considering the competition...  Even one of the Go-To-Gals only had one accepted!  It really shows that PC's selection process is really 'blind',  in that they don't look at who made the card, just at the creation itself.  That's one of the things I really respect and enjoy about their process, and I'm completely honored each and everytime I have something accepted!
I had a few I was really proud of that didn't make the cut, and I thought I'd share them with you this week.   Here are the sketches the wanted us to use when creating our cards.  For this card I used sketch 81.  I think this was my favorite submission...including the one that was accepted...

Did you have some submissions that weren't accepted?  Share them here at Damask Love, Amber is hosting a Reject Blog Hop!  After seeing all the gorgeous projects here, the next PC Go-To-Sketches issue is going to be AMAZING!!!

Sunday, March 6, 2011

Fly away fabric doilies

Alright ladies, I have heard you and am nearly ready...  For what, you ask?  Let's see if this creation can fill you in:
I can't tell you how many inquiry's I got from this tag and this creation featuring the fabric doilies, not to mention the dragonflies!  I'm getting ready to list on my Etsy account, both of those along with tea stained seam binding ribbons!  I should have everything posted on there by the 11th at the latest.
 Here is a close-up of the fabulous dragonfly, the ivory scalloped fabric doily and non-died seam binding ribbon.
I will keep you updated as soon as I get them up there.

Meanwhile, I've just found this great challenge blog, called The Creative Cottage Challenge blog.  They are right up my alley, a bit shabby, a bit cutesy.  I love doing challenges!

Saturday, March 5, 2011

Hostess with the mostess

I am hosting this week's challenge at Our Creative Corner!  This is my very first time hosting a challenge of any kind, so be gentle.  This one is a bit of a doozie...I like to keep you on your toes... it took me several tries to get a result I was happy with.  I love doing challenges that keeps me think outside of my typical box!  My 2 1/2 yr old daughter  Elizabeth inspired this challenge, she's been learning to count...now she's up to 20...but for the longest time she would say, "1, 2, 3, 4, 10, yea!"...we used to cheer when she would get to 5....  So, when developing this challenge, I decided to call it the '1-2-3-4 Challenge'.  Here is how it works:
  • Use ONE pre-patterned paper - not stamped, but you can of course stamp on it.
  • Limited to TWO layers - What is a layer you ask? Your card base is NOT a layer, neither are embellishments. Paper makes up the layers - mats would be considered a layer.
  • Use THREE different stamped images - your sentiment would be one of your images if it's stamped.
  • Limit yourself to FOUR embellishments - they can all be the same, or 4 different, it's your choice!
Here's what I did for it:

I used a paper from Webster's Pages, and cut around the frame with an exacto.  I stamped my sentiment in the frame and heat embossed it with Winter White EP.  I tucked the edge of some Crumb Cake stamped with French Script then stiched the edges.    I stamped and heat embossed the swirls for some added flair...and to get my 3rd stamp in...and used a button, hemp twine, pin and ribbon as my 4 embellishments.  This was harder than I thought, but it was fun to make!

Thursday, March 3, 2011

Feelin' blue...

Do you ever get that way?  I've been a bit 'blue' the last 2 days, don't know why.  Until...  I got an exciting e-mail yesterday that just made my day!!!  I won't share it with you yet, but it pulled me out of my doldrums and got me movin' again...thanks Terre and Stacy... 
I didn't get into my papers, but my fabrics instead.  Now - I have to admit that I am a hoarder.  Not the kind you see on tv...really, I'm not...but like many of us, I'm not only a paper hoarder, but fabric and clothing...to embellish...hoarder.  I don't sew as much as I would like, but always have great ideas for things and like to have the supplies on hand if I ever make the time to follow through with them.  I like to repurpose clothing, and there was a great post by Jen at Tattertots & Jello...a great blog for the general crafter...using cardigans.  I picked a few up at the local consignment shop for myself, mom & daughter.  I made this last night for Lily.

I've had these fabrics for a LONG time now, I liked the color combination....and that they all coordinated...but have never found a good use for them, until now!  A few buttons...couldn't use too many, 'cause I would have depleated my stash...and I made a fabric creation.

Saturday, February 26, 2011

De-stressed

Hi ladies!
It's that time again, OCC Challenge time!  This week, our challenge is hosted by Sarah at THinkING STAMPS.  Now I want you all to send her some love, she lives in Christchurch, New Zealand, where the recent earthquake was.  There is a lot of devistaion, her house was flooded and she was looking for a place to stay last we typed.  Send her all your thoughts and prayers this week, it's a very scary time for her, her friends and family.
On a brigthter note, her challenge this week is De-stress with Distressing! ...how appropriate...  Following the sketch she provided, here is the card I made.

I'm giving it to my Mother-in-law this weekend, she's visiting and we're celebrating our birthdays tonight with the Tierney clan.  I distressed the panels and added white paint to make it a little more spring-y.  Now go and release some stress and distress with us!

Thursday, February 24, 2011

Hop along!

My first ever Taylored Expressions Blog Hop!  Their stamps make the most adorable cards, like this one I had published in the Favorite Occasions Volume 2 issue of Paper Crafts Magazine.  Super cute, eh?
Now a short explaination about these cards.  Did anyone read Jessica Witty's post on PCConnection yesterday?  I was so at that place on Tuesday night, a great ideas in my head that just wouldn't translate into paper...I hate it when that happens...  So, I ended up making 2 cards for the hop. 
Taylor gave us our challenge for this hop, 'Going Green' with an optional sketch to use.  This is the card I was having trouble with.  I love TE's 'Hanging Out' stamp set and wanted to use it with the sketch provided and decided to 'go green' by using only scraps I had on hand.  Since I have been working on calls this week, I had a lot of fun options to use!  I followed the sketch...which is adorable...made those adorable little birds the 3 dots below the panel...genuis I thought... then it all went down hill from there...quickly...

This ended up being too fussy or not finished...I can't figure it out.... Perhaps the patternd paper needed to be framed?  It just doesn't seem to work for me.  That's when I decided to make another one with TE's CreativiTEA stamp set

This card came together quickly...except for the time it took to cut out the teapots and frame...  Lots of Shimmer spray on this and it came together much better!  That fabric doily, the entire card and the damask pot are all sprayed with Key Lime shimmer spray....yum...  I also love how I did the teapots, they are embossed with Ranger Pearl Silver EP.  When you use white pigment ink, it becomes the perfect pearl white color.  The second pot looks like porcelean, lovely!  Being the forward thinking gal I am, I knew I would enter these in the Moxie Fab Stampin' Techniques Paper Piecing challenge as well.  Both of these sets are pefect for using this technique, it just takes a toll on my hand...introducing the claw...

Alright - take a few moments now to check out all the other hoppers along the TE path!  You'll get so much inspiration...it'll keep you stamping for atleast  50 days...

Monday, February 21, 2011

Do I dare?

I think I must... dare to take part in the Moxie Fab Get Daring with Decorative Tape challenge!  This was a simple card, inspired by the only decorative tape I had....picked up on clearance a year back...  I decided to use it in a fun, retro-shabby-chic creation featuring the Cosmo Cricketpaper...I think... and PTI apron stamp.

I had to cut the tape in half for the corner strips, but not for the pleating...I could have though, it's pretty wide...  This was part of a package that had black tape in it for Halloween.  Perhaps I'll make another one for the challenge with those.
Don't forget to enter in my drawing for some Simple Shabby yummies!  Click on the link at the top of the blog for more details.

Saturday, February 19, 2011

Trigger Tuesday

On Saturday...Better late than never!  Look at this lovely photo Cath put up for this weeks Trigger Tuesday challenge at Moxie Fab.  Doesn't it look lushious?  I just want to crawl into that on a cold winter's day, with a good book and a cup of hot chocolate...mmmm.... 
With this inspiration, I made a cute little frame for my mom to put up in her new house.  She needs to slow down and enjoy this little things in life and not work so hard, I thought this sentiment could be a nice little reminder...are you listening mom?... 

This is a small little frame about 5" square.  I picked up a 3 pack of them at the Target $1 spot a few years back.  Time to make something cool with them, don't you think?  The frame was a perfect white, so I distressed it with a pair of flower clippers...the only thing I had on hand to use...
I cut the little squares 1", stitched them on a piece of crumb cake, distressed them and lightly added white paint around the edges.  The blanket in the photo reminded me of these fabulous fabric doilies I have, and had to use one for this...aren't they wonderful?...  I plan on making a few kits with these to sell in my etzy shop...whenever I find some time...

Christmas in February?

Oh jeez... this is the second Christmas card I've made this week! ...It's really only because I got a great new set that I am in shabby-love with...
All us DT girls have been busy over at Our Creative Corner, not only with today's challenge, but also with the amazing turnout for last weeks challenge...we had over 180 ladies play along, yea!...  It will be a few days before we announce our fav's but until then, join us for this week's challenge!
The lovely Sarah is hosting us, and her challenge is to use a sentiment stamps to create a backgound or panel for your card.  Now, being the resourceful gal that I am...and have limited time to stamp...I popped 3 birds with one stone and also made this creation for the Moxie Fab Stamping with Shimmer Sprays and the Flourishes Neutral Beauty challenges.

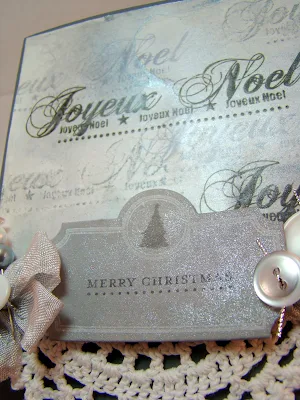
This is a VERY monchromatic card - white and greys, a change of pace for me.  I stamped the panel with the sentiment stamp several times with Versamark, Going and Basic Grey on SU! Glossy cardstock, and also embossed one with white EP.  I then sprayed it with Tattered Angels Granite Shimmer Mist, let it dry, sprayed again, let it dry, sprayed again...you get the idea...  I loved how the spray puddled in places.  I gently rubbed with my finger the Versamark images when everything was dry and it picked up the shimmer like a chalk...love it!... 
Isn't this lovely and shimmery? ...can you tell?...  I also added the shimmer spray to the framed sentiment as well.  Now, here's a tip - I discovered that with the glossy paper, you have to use a spray fixative to keep the shimmer from smearing off ...aerosol hairspray works... so remember to have that on hand.
I ended up using a similar layout to my WCMD card, 'cause I like it, and it worked with this.

AAA Cards challenge sketch!

 Hi all! It’s been a crazy 2 weeks…my moms been was in the twice!  Once for a broken foot, and the other is still an anomaly.  I’ve been nur...