Monday, August 25, 2008

I know it's not cards...

But I've really been busy! I just spent the last week preparing and planning my girlfriend's - mom's wedding. It was so much fun to get back into the Special Event planning hat for a week. It kind of makes me miss working in that field...kind of. Being 34 weeks pregant and creating 16 centerpieces, altar pieces and bunches of misc. items for the event made me EXHAUSTED by Saturday night. But it was totally fun, not that I'm ready to do that work full-time again.

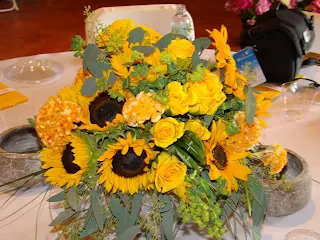
Here are some crummy photos of the flowers I did. Each table was a different color or red, pink, purple, yellow, orange and green, with coordinating napkins and accents.


The altar had two lamp posts decorated with flowers on either side. It had a "street" theme.

My camera didn't do a great job capturing the essence of the room. The place for the event was called Snook's Dream Cars in Bowling Green. Ohio. It is a quirky little car museum that could have been really cheezy, but was done with great attention to detail and I loved it! They have done a great job getting not only beautiful antique cars, but have set up a great atmosphere and other car related memorialbilia and antique games that feature a car theme. My husbands favorite was the Drunk-o-Meter, that shocked you based on how drunk you are and how well you play the game. He is now commited to finding one for his "man cave". If you are at all into cars - which I am not - or even have someone in your life that is, check this place out next time your in town. It's a quick visit.
All in all, it was a great time, the bride and groom are in love, too adorable, and enjoy each other's company, what more can you ask for?




Monday, August 18, 2008

Off of cards, for the week...

I know it's been a while, but I haven't been making cards this week. This week I focused on gifts for my BFF's little sister, we are both pregnant with girls and due only 2 weeks apart. So I spent this week creating things for her to give her at her baby shower this past Saturday.
The first items are a set of custom onsies. The one shown is the one I liked the best, it makes me giggle. The image is an iron-on from Joanne's - too cute eh? I stamped the words 'little stinker' with whimsical lower case stamps and craft ink. I thought about using the Stazon...any suggestions? On the back, 'big' is done with Big Deal Alpha and pink fabric paint - the craft in light colors tends to dissapear after 1 wash - and 'stinker' again with the black craft. I made 3 others for her, one with her name 'Natalie', 'princess' and the last, 'Q-T'. All of them had the cute stick figures on them.

The last item I made for her is this...
I am SO impressed with myself. I made it late one night and almost had to wake my hubby up to admire my work! I also had to make another one for my bundle of joy 'cause it's just so darn cute!!! I have now purchased tons more fabric to make more for her and Lily, so they match. Now I can see why my mom had so much fun dressing my sister and I alike.
Well that's it for now. I promise to get back to stamping this week!

Sunday, August 10, 2008

A night of fun

This card so so outside my norm but I really liked how it came out! I spent the evening creating for some me time. I worked ahead of the group (my teachers would be so proud) and did the Verve Anniversary challenge AVS10 early, then realized I couldn't post today. So much for being the early bird!

I'm in a Designer Paper (DP) mood tonight, so the striped paper inspired the colors for this one. The colors used are Certainly Celery (CC), Ruby Red (RR) Pumpin Pie (PP), Perfect Plum (PP2), and lastly, yes it's true, some of it still exists, COOL CARRIBEAN (CC2)!!! I am a paper horder you know. The main panel of RR (run thru the Cuttlebug) and the DP is layered on CC2 and CC with ribbon from Sorbet wrapped around the middle (I wish I could get 10 yards of this stuff!). I layered on 3 panels of PP (again run thru the Cuttlebug) over the ribbon. The sentiment is from 'For a Friend' inked with RR and Lavendar Lace markers. The flame is some 3D glue I got from Michaels with some glitter on it. That is layered on CC and CC2. Finally I added a 1" circle of PP2 with a circle of white uniball ink (traced around a 3/4" circle) cut it in half and added it to the corners. I never would have come up with this sketch on my own, so its good to try something new. I really liked how it came out!

Easy Peasy!

I think this may be my favorite one I did last night, although the photo came out blurry. This is also for the Verve Anniversary challenges, AVS09.


I was inspired by the Designer Paper for this one. The colors are Kraft (K), Certainly Celery (CC) Pumpkin Pie (PP) and...wait for it...Cool Carribean (CC2)! I know you are all jealous, I have a huge stash of it still! The striped DP and the paisley DP are layered on CC and CC2, all placed on a K card body. I wrapped the layers with ribbon from Sorbet. The sentiment from 'Happy Harmony' is stamped with Close to Cocoa on Whisper White, then layered it on PP, CC, CC2 and K. I added a flower from the Pretties kit colored with So Saffron and Apricot Appeal then added the gold bling! Super easy peasey!

Shall I dare?

I'm on a mission! I'm going to do all the Verve Anniversary challenges! This one is for AVS05. I've never made a long card before so I'm not sure of what dimensions to use. I know I'll have to make my own envelope for this one.

I used Regal Rose (RR), Pretty in Pink (PP), Rose Red(RR2) and the new SU! In Color Pink Pirouettte (PP2). I started off my embossing with white EP 3 images of the flower from 'Dare to be Fabulous' on RR, PP and PP2. I cut them out with the PP2 the smallest flower, PP the medium flowr and RR the largest flwoer. It is put together with dimensionals and I added 3 pearls to the center for some glam. The flower is layered on PP2 stamped with 'Filagree' then layered on RR2 and RR. The main background is all on RR. I stamped the next layer of RR with the 'Polkadot' background stamp with RR ink and embossed the sentiment in the bottom left corner with white EP and colored in the word with RR and RR2. The center layer is PP2 stamped again with the 'Filagree' background stamp and layered on RR2 with the bottom edge punched out with my SU! scallop punch. I added the holes with my 1.8" punch. RR grosgrain ribbon was wrapped around this layer and I added a bow with a mini glue dot.

So how confusing was that with all the RR's and the PP's?

Funky fresh

This is another one I did last night, its for the Verve Anniversary challenge AVS07. I used only designer paper on this one. I love this paper, its so vintage, cool and fresh!


The bright Designer Paper (DP) inspired the colors of this card. I used So Saffron (SS), Elegant Eggplant (EE) Regal Rose (RR), and Soft Sky(SS). The 1st layer is the SS DP prints from SU! layered on EE. I then wrappes SS ribbon around the bottom and added a bow with a mini glue dot. The fun DP is layered on SS and EE. I used my scallop punch to do the bottom edge of the EE then layered RR behind it for extra color. The sentiment is from'Sincere Salutations' on Whisper White paper with EE ink, then sponged with SS around the edges. That is layered on SS, RR and EE. I added a flower with a pink brad for fun. It's not my favorite card, but it's cute.

Polkadot Imperfection

So as I sat up creating for a while last night, I started off with a bang, and ended up at a whisper. Let me show you...
This card was the last one I did, it's for the Verve Anniversary challenge AVS06. Notice how the words are not center in the circle, and how my brads on either side have a different placement? I think I may have dosed off while making this one. Anyhow, I used SU! colors Basic Black (BB), Certainly Celery (CC) and Old Olive (OO). I stamped the OO with the Polka-dot background stamp with OO ink, then wraped the corners with a wide black and white polka-dot ribbon. I layered that on BB. The center circle is from 'Sage Advice', it's probebly one of my favorite quotes. I stamped it with Versamark on CC Designer Prints paper and cut it out - incorrectly- with my Colluzle (I don't have Nestabilities yet). The scallop edge is from Quickutz and I cut out BB, then made more polka-dots with my uniball white gel pen. The side panels is the ribbon and I used my Crop-a-dile to punch the holes for the brads. I didn't notice the brads were off until after I had finished the card. Oh well! The whole thing is on a Whisper White card body.

Saturday, August 9, 2008

Verve-a-licious!

I have to say that I love all the images made by Verve Stamps. They are cute, fresh, stylish and fun! I just wish I owned some...but alas, with baby #2 only a few weeks away, my stamping budget is being spent elsewhere. I do enjoy receiving Verve updates from Poetic Artistry, a blog by the company's owner and stamp designer Julee Tilman. Last week was the companies first anniversary and they were having card challenges everyday. Since I was out of town, I'm doing them now.


I made this card for my BFF younger sister, who is having a baby girl (just like me) on the 15th of September. I can only hope my baby decides to come that early, as she is due October 8th, but is likely to arrive early.
I made it using the Verve sketch AVS02, and I used Whisper White (WW), Pretty in Pink (PP), Regal Rose (RR) and 2 designer papers(DP) from Memory Makers. Its a square card, which I almost never make, so it was a great challenge for me. The card base is WW layered with PP and RR. The striped DP is scalloped using the SU scallop punch with holes punched out with the 1/16th punch. Those layers are then wrapped with a retired SU! ribbon (I'm a ribbon and paper horder). The next layer is made with the green polka-dot DP again, punched with the scallop punch, I cut the square in half and attached it to a piece of RR. I layered clear(backed with PP), green and clear green buttons on the RR with mini glue dots around the edge. I then attached my sentiment (For a Friend) which was stamped with Always Artichoke ink and colored in with PP and RR markers, layered on Old Olive paper. I attached the sentiment with 3 layers of dimensionals above the buttons and added PP buttons on top. Finally I made a knot with the retired ribbon and attached it with a mini glue dot.

I'm planning on creating some special gifts for her, as she lost her first baby 3 days after she developed toxemia and had to deliver at 25 weeks early last year. This new baby for her is a gift from God that will be spoiled like the princess she will be!!!

It feels like spring...

Well, I'm back from our last vacation of the summer...it was a long one for me! A week in Petoskey Michigan (fabulous place and weather!) then 3 more days in Perrysburg with my parents before they left for Seattle for 5 1/2 weeks! Whew...now that I'm back, I'm following Doctors orders, doing things that keep my stress level to a minimum for baby's sake :). So that means stamping (No arguement here)!
Here is one I did for last weeks SCS color challenge 177, Groovy Guava (GG), Whisper White (WW) and Sahara Sand(SS). I of course added another neutral (well, what I consider a neutral), Chocolate Chip(CC). The card base is an A2 card of SS. The bottom layer is SS stamped with the wheel from the Spring Solitude Bundle inked with SS. I sponged the edges with SS and layered it on GG with the bottom edge punched with the new SU! scallop punch (love it!) and polka-dots with my unibal white gel pen. I wrapped the layer with a wide white grosgrain ribbon I have. The second layer is on SS stamped with the Spring Solitude solid flower stamp with SS ink, then I used Versamark with the flower outline stamp to emboss with white EP that over the other stamped images (does that make sense?) My embossing buddy failed me this time, as there are TONS of white EP flakes everywhere. I stamped the sentiment with SS marker and Versamarker and embossed the word 'you' with white EP. The panel is sponged with SS around the edges and layered on GG. I then attached that to the 1st layer and wrapped it with CC grosgrain ribbon. The final layer I used the branch stamp, inked with CC marker and SS marker and stamped it on SS, then stamped the bird with Versamark and embossed with white EP. I punched the image out with my 1 1/4" square punch and sponged the edges with SS, used my 1 3/8" punch with WW and cut out CC to frame this. Finally, GG is punched out with my Marvy scallop square punch with white polkadots again around the edge and I added a CC grosgrain knot with a mini glue dot. I have to say that I really like this stamp set, it's a shame it to me so long to get it!

Christmas tags with SOC!

Hi all! It’s the crazy holiday season but you still need to create!  Join us for Sisterhood of Crafters challenge this time around.  It’s an...