Thursday, February 22, 2024

Have a heart...

 My very first Spellbinders Monthly Small Die!

Hi all!

What do you do when you're having a hard time while creating?  Do you keep going through it, no matter what?  Do you set it aside and save for another day?  Do you toss it and start over?  If I set it aside, I'll think about it constantly.  Throwing away something that isn't working feels like throwing away a piece of time...and my time in my studio is valuable, so I can't to that!  I generally power through...not with great results most times, like today....


I'm trying to again make challenges a priority in my creating, and with February being the month of love there are MANY heart challenges happening right now!  With the inspiration from Inkspirational, Hand Stamped Sentiments, Just add Ink and the Flower Challenge; I decided to use my very first Spellbinders Monthly Small Die, a Lotta Heart.  It's no longer available, but it's new to me and is totally cute. 

I was riding the struggle bus with this one...front row...seat belt fastened.  I am not a fancy fold kind of card maker, but this die is perfect for creating a gate folded card so I had to try it.  I may have been a little distracted while making this so I overlooked the fact the paper moved on the die cut until after I started glueing down the pieces...and you can't really see the ink blending done on the pink paper behind the die cut ones it was assembled.  ***sigh***

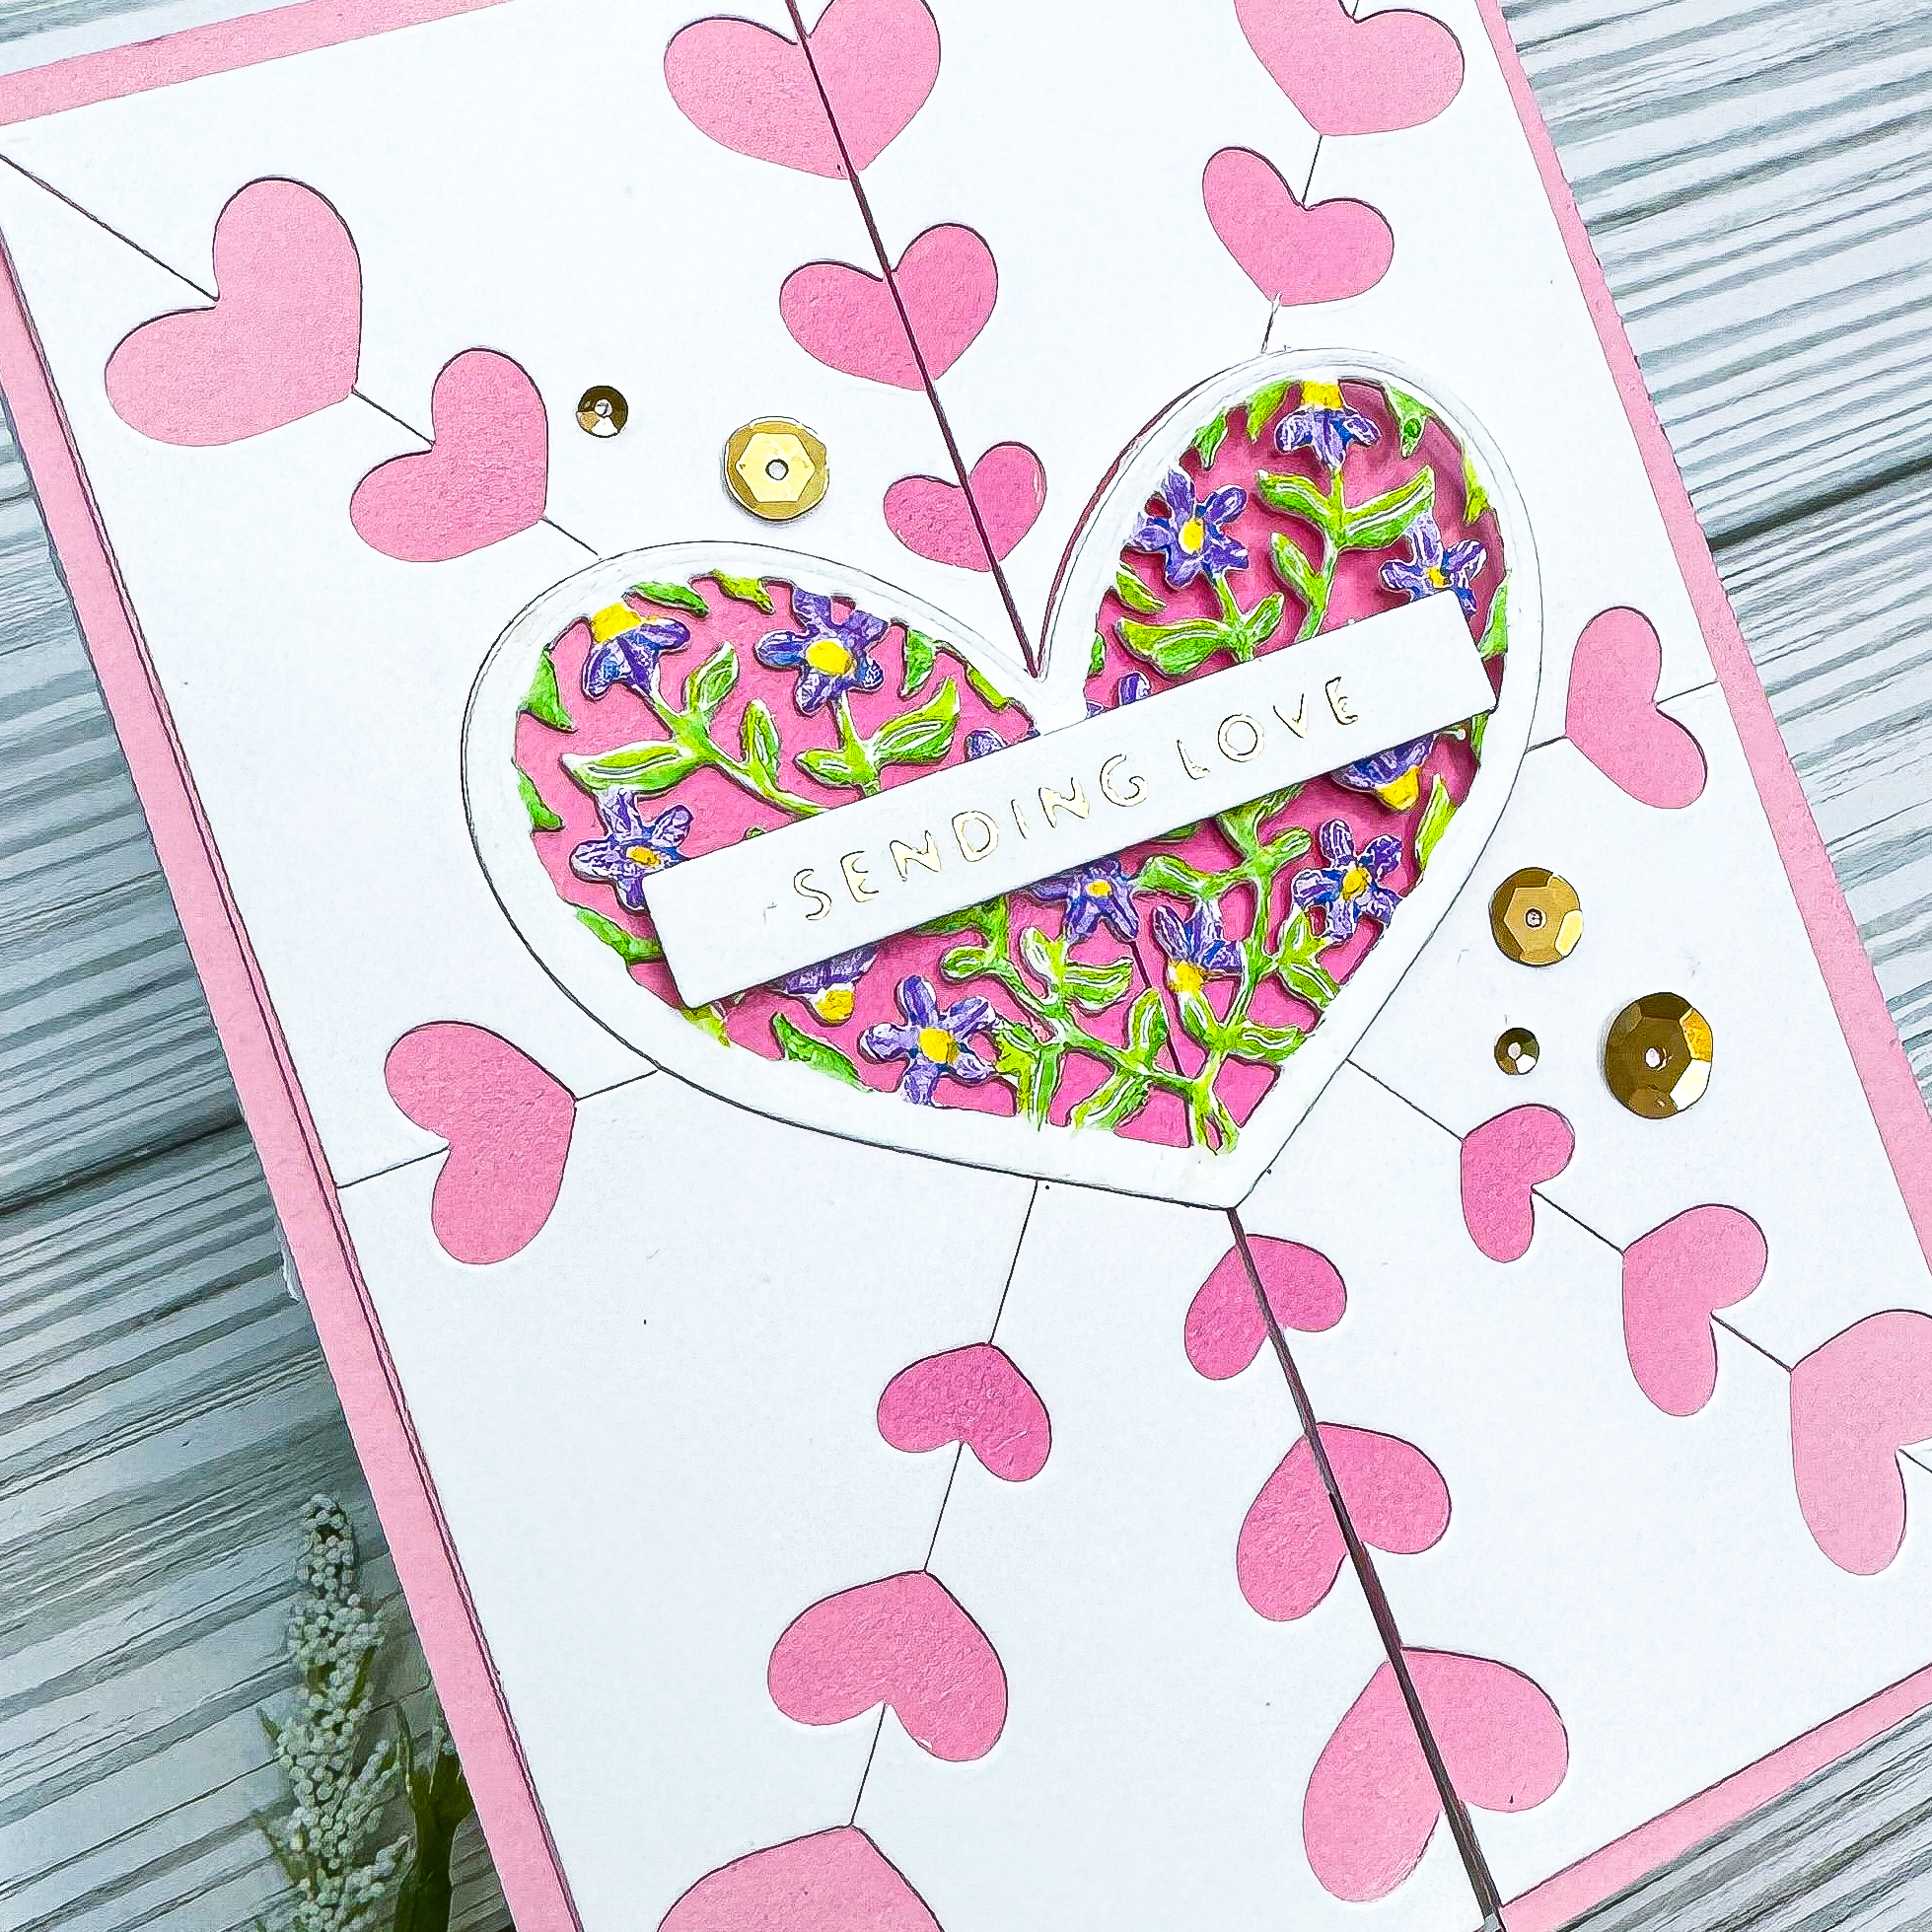
Coloring the center floral die was also a struggle...What is your favorite coloring medium for little intricut die pieces?  Watercolors and beautiful and soft, but they're hard to control on small spaces.  Alcohol markers are wonderful with saturated colors, but can seep outside of where I want them to go since I tend to be a bit heavy handed.  Altenew's new Acrylic Markers are FANTASTIC, but the tips were too large for my little spaces.  So, colored pencils were the choice for this project...still up in the air about the results.

The sentiment was from my sentiment scrap bin and is from Altenew's Essential Sentiments foil set.  I cranked a bunch out and just have them in my bin for cards like this one.  It was finished off with my favorite satin gold sequins.  

So.....struggles are real...keep working through them.  It gives you a sense of accomplishment if you push through them...even if you don't like the results all that much.

Have a colorful day!

Tuesday, February 20, 2024

End of winter? - FESTIVE FRIDAY FAVORITE!

 Die cutting shaped cards for the end of winter...

Hi all!

Is it truly almost the end of winter?  Did Puxatawny Phil really predict that spring will come early?  It seems that way here in Northwest Ohio...40-60's predicted all week long!  It was a little hard to create this winter themed card with the gorgeous weather here today!  Usually we're bundled up until the end of March, just hoping for sun in an otherwise grey season. 


The challenges for Triple B and Four Seasons inspired the winter theme of this card, but the Festive Friday challenge had me add a few elements I wouldn't have normally tried.  For example...

A shaped card is NOT in my wheel house at all!  That is the point of challenges...to push you to create something that is yours but in a way that is completely different.  Creating a card not in a rectangle shape was simple enough using the Spellbinders Essential Four Petals Label die, and I may end up doing them more often...we shall see where the mood takes me.

To keep with the winter theme, and the 'white' & 'embossing' elements for the Festive Friday challenge, the inside die cut panel was embossed with Altenew's Starry Pattern embossing folder which has a subtle snowflake pattern.  The bird as a nod to the Triple B challenge, was stamped using Altenew's Birds of the Season stamp and die set.  The main body of the bird was inked using Morning Frost Crisp Dye ink and a blending brush to give it a touch of color so it still looked like a white bird.  The next two layers were stamped with Crimson and Permanent Black inks, then the bird was die cut.


During the holidays, I did a fair bit of die cutting and found the ginko leaves by The Greetery in my floral scrap bin.  The sentiment from Altenew's Sweet Sentiments was also in my sentiment scrap bin...yes, I organize my scraps, I'm kind of crazy about that...  Inspired by the Four Seasons photo the card is finished off with a few red enamel dots from Pink Fresh.   Adding some gold metallic splatters, as well as a little bit of sparkle using Icicle Stickles, for the 'glimmer' element with Festive Friday.

Whew!  That was a ton of information!  I hope you too are having unseasonably lovely weather to finish off your winter season, have a colorful, sun filled day!

Monday, February 19, 2024

Foil Fix

Figuring out Foiling hacks!

Hi all!

I'm beefing up my birthday stash and decided to use foils for a few of them.  I have to admit, I do tend to have some issues with foiling.   Sometimes it just doesn't want to play along with me.  With trial and LOTS of error, I think I may be on the right path for foiling perfection, but wanted to share the process of how I fixed some issues instead of just tossing the problems in the circular filing bin.  What tricks have you found work best for your foiling?  Please share them in the comments...we all love to learn!

Since I am in birthday card making mode, it's a perfect project for the Time Out Challenge since it's their 10th birthday!!!  Thanks for all the challenges and inspiration over the years!

I have found that using a heavier 110-140 lb white card stock works best for me, but my 80 lb colored cardstocks have little or no issues with the foiling process.  Not sure why that is since I've used the same weight papers, but I'm not one to upset the crafting Gods, so I just go with it.   For the Altenew Golden Days foil die, I did try using my 80 lb white cardstock with a shim, but alas...but I got over foiling in the negative spaces.  Instead of tossing the panel, fussy cutting the parts off that had the issue is a good solution.  Since the flower was cut before it was inked...I won't make that mistake again... it was smaller than the coordinating Golden Days #1 stencil, so it was not used.  Instead the flower was inked with the remaining stencils using Pink Pearl, Coral Bliss and Crimson Crisp Dye inks.

The background panel was foiled onto colored cardstock with zero issues using Spellbinders Simon Hurley Geo Snowflakes foil die with their Glimmer Opal foil.  It gives a very subtle shimmer while maintaining the background color.  A little ink blending of Coral Bliss behind the flower helps to make it pop off the background.

Finally, left over foil from a previous card using my trusted Versatile Greetings 2 was used for the sentiment...it pays to save scraps....  The flat Essential Glimmer Solid Rectangle hot foil plate allows the negative foil pieces to be used a second time...it's the beauty of using foil.  Those left over pieces come in handy in all sorts of ways!  They were then die cut and added to the card.  Finally, my favorite sequins from Altenew were added for even more sparkle!

Have a colorful day!


Birthday Love

 Ink Blending with Altenew's NEW Dainty Hearts!

Hi all!

It has been a CRAZY February so far.  LOTS of traveling by plane and car this week alone.  Part of my travel included a weekend in NYC for fashion week!!!  EEEKKK!!!  I'm obsessed with fashion, though my mom bod isn't 'high fashion' shaped, I swoon over the beautiful clothes.  I will say, shoes, bags and jewelry always fit and I did pick up my share of both over the weekend...can you blame me??


Although I was only home for 3 days this week, I was fortunate to spend one of those days in the studio getting out some of my creative energy.  Leaping off from Altenew's February Challenge colors and the arrival of my newest purchase from them, this card came together perfectly!  

The new Dainty Hearts foil plate and stencil combo was SO easy...they make a stunning background! The stencil is genius, it has 3 stencils, but when you flip them, it's like having 6...Altenew is so flippin' smart...  Using their mini blending and detail blending brushes with the Crisp Dye Inks Sweet Leaf, Pink Diamond, Pinkalicious, Sunkissed, Orange Cream and Wisteria, I was able to create this background in no time at all!  I'm excited to explore some new color combos with this set.  

This gorgeous panel needed a foiled sentiment!  Since I am very low on my birthday stash of cards, I opted to use the Versatile Greetings 2 foil and die set.  Keeping the sentiment simple allows the background to really shine.  The card was finished off with some pearl dots to highlight the flower centers of the hearts.

The gorgeous pattern from the Dainty Hearts would make a beautiful quilt dont' you think?  I wish I knew how to quilt,  maybe some crafty sewer could re-create this pattern?  Once this card was finished, I knew I had to add it to the Inspired By challenge as well.

That's it for me!  Have a colorful day!!

Sunday, February 18, 2024

Birthday Bokeh

 A Bokeh Birthday with The Stamp Market

Hi all!

It's time for a new challenge over at AAA Cards Challenge blog!  The theme this time is Birthday themed Anything Goes.  So as long as its a CAS birthday card, you're in!  

I have to apologize for my photos, I have a new phone and new editing software I'm trying to figure out, so the photos aren't as crisp as I like them.  You'll get the general idea with them...I hope.  Any suggestions on editing software for an IMac?  I'm on the struggle bus here...

Any hoo...the card front was ink blended using The Stamp Markets Bokeh stencil set with Altenew's Frosty Pink, Sunkissed, Citrus Burst and Dew Drops Crisp Dye Inks using their fantastic mini blending brushes.  A background of the colors were added first, then repeated inking the colors using the 2 stencils in the set to create the colored panel on the card front.


The birthday sentiment is from one of my most favorite Simon Says Stamp sentiment sets, called Elegantly Modern Greeting.  It's a great basic set for any card maker, highly recommend.  It was stamped and heat embossed with Altenew gold embossing powder, then the 'birthday' was die cut with the coordinating die to create the window.  5 more pieces of card stock were cut and glued together to create the shaker element.  It's not how I would normally create a shaker card, but I thought I'd give it a go with this...don't think I'll do it this way again however.  Close up you can see the layers through the window, so I think I'll stick to my traditional foam core technique.  It also gives the shaker elements space to move more freely.


The sequin shaker pieces are iridescent in the same colors of the inks making it the perfect addition to the card.  The sentiment is finished off with a stamp from the same SSS set and a few confetti bits were added for more sparkle.

Now go whip up a CAS birthday card for your stash, and be sure to share it with us over at AAA Cards for a chance to be a guest designer!  Give those DT's some love too while you're at it...

Have a colorful day!

Friday, February 16, 2024

Late to the game...

Tim Holtz Distress Inks...who knew?


Hi all!

Welcome to another challenge with CAS on Friday!  I am so grateful you are here and hope you find inspiration for your personal creating.  Be sure to visit each of our DT's blogs and hear about their processes...you never know what you'll find out!

Like here's a little tid bit I bet you didn't know....I have never used Distress inks.  I know...for shame!  I am very late to the Tim Holtz Distress Inks game.  I purchased a bunch back in the fall, but just now pulled them out to see what the hype is about.  I don't understand the magic that these ink posses, but I think I get it!  The texture of the inks are so creamy without being sloppy and they do blend like a DREAM!  


Using Pickled Raspberry, Mowed Lawn, Faded jeans, Villainous Potion and Hickory Smoke with Spellbinders sponge applicators and the Altenew Circle Mask and Stencil, the little glimpse into space is the perfect backdrop for my 'vintage' rocket stamp.  The stars are water splatters as well as splatters from metallic silver, blue and black watercolors.


This stamp is one of the very few maculine stamp sets I have in my extensive collection.  I probably should get a few more with a hubby, dad, brother and 2 nephews in my life!  They are sorely neglected.  Any hoo, this is an old Papertrey Ink set called Out of this World.  They have a new one in its place if you're looking for a cute outerspace set.


After stamping the sentiment with Altenew obsidian ink, cute little enamel stars were added to complete this little space scene.  I think I'll pop this card into the mail to my little nephew, he fell and cracked his knee cap over the weekend and hopefully it will cheer him up!

Now go check out the other DT's masculine cards to help ignite your creative process, I know I will be!

Have a colorful day!

Wednesday, February 14, 2024

Embossing Love

Embossing with Altenew's Craft Your Life LOVING YOU set on the Sisterhood of Crafters challenge!


Hi all!

So happy you are here to join us for another challenge at the Sisterhood of Crafters!  An with today being Valentines day, what better theme for our challenge than LOVE!  I know you have all been out there working on those cards for your loved ones, so let's see them!

I made this card for my dad to give my mom.  He has pretty advanced Alzheimer's disease, but most days he knows my mom, but even on the days he doesn't, he knows she's important to him.  The body just knows things even when the mind doesn't, ya know?  He does get excited to give her things still, which is amazing!


This card is made from Altenew's recent Craft Your Life series release, Loving You.  It comes with the stencil and the embossing plate...which is GORGEOUS!  I just adore this set and I know I'll be using it for years!  The main image is stamped then heat embossed with gold embossing powder which just makes it pop off the card.  Next, using the stencil, the blue flowers and their stems were inked, then finished off with some colored pencils on the main flowers. 


After die cutting the image out, the white edge was then colored with a marker to make it match the background paper and 2 more die cuts were used cut from the same colored paper to make it stacked and pop off the card front.  The sentiment from the same set was also heat embossed.  It was a difficult decision on what color to make it, it started off the same color as the background, but ultimately the blue won out, although you can still see a hint of that purpley-pink color peeking out in some places.


Finally, the background was simply made with the embossing folder using some old SU paper I have still on hand, couldn't give you the name it's been so long, but I think it's rose something?   

That's it!  I hope you'll join us for this challenge, I'd love to see what you do for love!

Have a colorful day!

Sunday, February 4, 2024

Home is where my heart is...

 AAA Cards Challenge with NEW stamp sets!

Hi all!

Its time for another fabulous challenge at AAA Cards!  This time we have a sketch...what will be your take on it?


I used this adorable set from Simon Says Stamp called European Streets.  The background was masked to fit the challenge sketch, then stamped with the snow and brick images in the coordinating set.  It was then heat embossed with Altenew white powder.  Altenew's Fresh Dye inks in Dew Drops, Teal Cave and Navy were ink blended for the background to make the embossing pop.

Simon Says Stamp European Streets

Attempting to make the townhouse look 'snowy', the window image from the 3 layer stamp set was heat embossed with white powder.  Going along with this month's Simply Clean and Simple challenge, using a little pink, I opted to make the house my favorite color...well, one of them anyway.  The first and second layers were then stamped in Altenew Rose Quartz and Puffy Heart, with the awning colored with the coordinating alcohol markers from that color group, Cosmic Berry and Purple Wine.

To help take the 'snowy' effect home, glitter Stickles were added along the windows, awing, snow piles a few of the snowflakes and top of the building.  The card was finished with the sentiment from the set.  Easy CAS card with PINK for the challenges!

Now...show me your creation using the sketch, and be sure to visit the DT and show them some love as well.

Have a colorful day!

Saturday, February 3, 2024

Loving Lunar Paste!

Channeling Dolly Parton with Simon Hurley's Lunar Paste!

Hi all!

I am a girly-girl through and through!  Don't get me wrong, I am in my element in a horse barn or camping as well, but I'm going to do it with pizzaz and some shimmer!  How about you?  Are you into the bling...the shimmer...the shine...the sparkle?  Then you'll love this post!


I have been obsessed with the Simon Hurley Lunar Pastes for a while, and even have quite the stash of them.  Using them in unexpected places on flower stencils or with eye popping color combos are some of my favorite ways of using them.  

The Simon Says Stamp Puppy Love stencil was perfect for this embossing paste background technique, simple and repetitive to make a texture with just a little design. Sticking with the Color Hues, Colorful Options and JUGS color challenges, using Prom Queen Lunar Paste color against red cardstock...oh gracious it is so YUMMY! The pink is just POPPING off the background...it's even more fabulous in person!

Since the background was so fantastic, the rest of the card needed to be simple...but there's nothing wrong with amping up the shimmer.  I channeled my inner Dolly Parton using more PINK and the Fancy Love You sentiment die from Simon Says Stamp cut from Altenew Tourmaline glitter card stock...look at it sparkle!!!

The whole thing is finished off with some sequins in red and white, because Dolly would have wanted it that way... 

That's it for today, have a colorful, shimmery, sparkly day!

Friday, February 2, 2024

Noted Hearts

Simon Says Stamp Noted Hearts for CAS on Friday

Hi all!

Welcome to another challenge at CAS on Friday!  This fortnight's challenge is VALENTINE'S!!  I used to love to exchange the little paper valentine's when I was in grade school.  Making a pretty little bag...no boxes in the late 70's-early 80's.  We would tape them to the front of our desks then drop in our classmates bags...up and down the rows...  I once made mine, it didn't go over well.  They were a hot mess, but also, kids didn't do that back then!  It was considered...weird...if they only knew how weird I would get!!🤣🤣🤣


First, I need to apologize for the quality of the photos.  My phone took a nose dive on my weekend trip to NOLA...it was innocent!  It fell out of my pocket when I was climbing out of a carriage tour, so no alcohol was involved even though I was at Mardi Gras.  Only the camera part and back were damaged which leaves the pictures a little wonky.  Coupled with the fact I am still working on learning my new computer with its' editing software, and it's a perfect storm for weird photos!  I'll be getting it repaired this weekend, but until then, hopefully we can endure it...  


This card features a new set from Simon Says Stamp Smitten collection called Noted Heart.  It's so cute and perfect for making tags and valentines for school aged kids and teachers.  Since I used to be a teacher, I think that is why I love this set so much!  The set has a variety of sentiments to go with the main statement, but since I love EVERYTHING about my high school aged daughter, I went with that. 


The notebook paper heart was stamped with Ocean Waves Crisp dye ink and little hearts with Coral Berry and Ruby Red.  The photo doesn't show the difference in the color...thank you broken camera...and I added red Stickles to the solid heart to make them pop!  Everything was stamped on a card front panel die cut with My Favorite Things Wonky Stitched Rectangle Die set and added to a card base.

That's it for this week!  Be weird like me and make your Valentine cards, then share them with us in our gallery, we love to see your work.  

Have a colorful week!


Wednesday, January 24, 2024

Winter Blues

 Hi all!

Its that time again!  Another challenge for Sisterhood of Crafters is ready to roll!  I just love doing challenges, they really help me work outside my comfort zone and try different things.  This fortnight challenge is WINTER BLUES.  I have a friend that always gets sad during the winter months, so I went that route when making this card.  Some snail mail love to cheer her up, but also not remind her of the wintery mess outside.


This card has an acetate overlay with foil added to it from Altenew's Nordic Vines set done with Rose Gold foil.

The card base has the same foil plates 'letter pressed' into it.  I didn't have the BetterPress system at the time, so I just used a rubber mat I had with my die cutting machine.  Unfortunely, the edges of the plate show, which wouldn't happen with the BP, but it still looked good so I went with it.  It is also swiped it with some Dusk Crisp ink to make it stand out more.


It is finished off with a sentiment from the Versatile Greetings 2 die set, with the background cut from Topaz card stock.

Hope you're all staying warm!  Now go check out our DT's work to inspire you!  Have a colorful day!


Sunday, January 21, 2024

Cozy Cold Colors

 Hi all!

Still figuring out how to work my new computer with photo editing.  It's always been a challenge...before, using my iphone to my Windows computer via Lightroom.  Now my phone and computer 'talk' to each other, but I can't figure out the Lightroom on the iMac.  Ahhh...first world problems!  I am grateful for all that I have, even though I hate technology.  In the meantime, I've made a card for the current Color Throwdown and Triple  B challenges, their color combos are very similar and just spoke to me!


Such gorgeous soft colors together!  I will have to save this combo in my bank for a future card...


I'm trying to decide if my blue wasn't 'dusty' enough.  I used Altenew Blush, Pinkalicous, Misty Morning and Cloudy Sky Crisp Dye inks for the flower and the leaves.  The blush was applied in 2 layers, I didn't want to go too red since the next color in the family was Rouge...definately not a blush.


The background was in my scrap bin, and made from Altenew's Fine Frames Cover Die set.  Using the rubber mat that came with my die cutting machine, the die was embossed onto the white card stock, then die cut it onto gold mirror paper.  


Some my think I'm crazy for having the scrap bins...they are even catagorized by theme so items can be found easily...and they certainly came in handy for this card! This sentiment from Essential Sentiments was in there, which is perfect for my bestie going through some hard times right now.  Snail mail hugs to the rescue!

That's it for today...If you have any suggestions for how to use an apple computer, please share!  I'm eager to learn some tricks!  Have a colorful day!