Thursday, August 23, 2007
Back to School
These are for a really fun class I am doing this weekend. The theme is Back-To-School, and we are making lunchboxes, spiral notebooks, a post-it note holder for the teacher, pencil box and a crayon or colored pencil box. Everyone gets to select their own kit and there is enough product left over for a 6x6 scrapbook or 40+ card fronts! My goal with this was to do little or no stamping to show how beautiful these kits are by themselves (for my non-stamping ladies). I hope they all have fun with these!
Monday, August 13, 2007
Workshop CASE
Saturday, August 4, 2007
Mom's class for friends
Wednesday, August 1, 2007
Fabulous!!!
Thursday, July 12, 2007
Finally, I'm stamping again!
Wednesday, July 11, 2007
Bows, bows, bows!
1. Shape two evenly sized loops, one in each side of the ribbon.
2. Cross right loop over left one.
Monday, June 4, 2007
I'm Baaaack~
Friday, May 18, 2007
Look at what I've been doing!
I had to use my favorite stamp set, A Little Love for this one. It's my favorite stamp set and card layout.
This one was by far the hardest for me to make, I don't have any Thanksgiving stampsets!
I think it's pretty self explanitory why I used this stamp for my Love Note card!!
Wednesday, May 2, 2007
Heartbreak...
Then a ray of hope...something new, exciting, and cutting edge on the horizon? While I morn the departure of my dear good friends, the remaining 13 (yes, only 13) stamp sets and I eagerly await the arrival of new bundles of joy! I have had a preview of the hostess sets alone, and they are AMAZING!!! I can't wait to "bulk" back up so I can create hip and happenin' cards, scrapbook pages and 3D items to knock your socks off! Check out the list and let me know if you need to order that stamp set you've been eyeing, because after June 30th, they are off the books!
Who'd a thunk?
Sunday, April 29, 2007
Simple Invites
The last 2 are the really simple ones! The 3rd one has a black embossed Floral piece of paper trimed with red grosgrain, and the last one is totally computer generated and just mounted on Real Red paper! I'd love to hear your opinion or suggestions too...please leave a comment!
Tuesday, April 10, 2007
Little Sis Paperbag Book
This is page 1 & 2. There are 2 pull out tags for photos or journaling between pages 2 & 3.
These are pages 3&4. There is a tag for journaling on page 4.
These are pages 5&6 with 2 pull out tags on page 6.
This shows the detail of what the pockets look like. They are made with the opening of the paper bags.
Paper Bag Scrapbook
This is the front of the book. The colors for this book was inspired by the striped ribbon I used in the binding and on the front. It has Yoyo Yellow, Pumpkin Pie, Old Olive, Whisper white and an old SU color, Mint Melody. When I found this ribbon, I thought the colors were unusual, but pretty. I used white lunch bags I found at a local craft wholesale store, but they are also available at GFS. I punched 3 sets of 2 holes and tied various ribbons thru them to make the binding of the book.
This is page 1 & 2. I used SU daisy flower punch to create the edge of page 2 and attached daisies to the edge of the tag that are in the pocket.
These are pages 3 & 4. Under the flap of the bag I added a tag that is removable for journaling.
These are the last 2 pages in the book, and it also has a daisy pull out tag from a pocket made from the opening of the bag.
Saturday, April 7, 2007
Birthday Party!
Wedding Shower Invitation
It's been so busy here in Ohio! I just planned and finished my future Sister-in-Laws bridal shower and it was fabulous! Special thanks to my good friend Janna of Janna Coe Designs, Pickerington, Ohio. She got me the flowers for the shower, and they matched the invitation perfectly!. Katie and Audrey did a fabulous job with the game, restaurant and slide show (I guess I didn't plan all that much!) Here is a photo of the invitation!
Tuesday, March 20, 2007
Vacation is over!
Tuesday, March 6, 2007
I love to alter ANYTHING!
Now that I've got my camera working again, I can now post a few things that I've been working on! I'm a member of SplitCoast Stampers, Secret Sisters Club, and here are the gifts I'm sending my "little" this month!
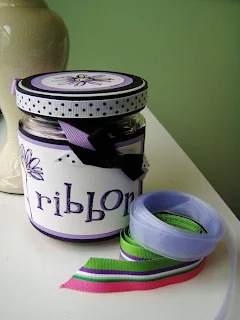
The first item is for my "little", she loves ribbons for her projects, so I gave her a sampling of all the ribbons I own for scrapbooking. I think it ends up being about 60 yards! The jar is an altered salsa jar (my DH loves salsa) I cut the circles using my Coluzle, lightly sanded the lid and attached the circles and ribbon using Modge Podge. The sign on the jar is attached with sticky strip on the ends and mono for extra security on each layer. I hope she likes it!
I love to alter anything I can get my hands on, and it's amazing what you can find at you home or even in Target's $1 Spot (my favorite place for alterables). That's where I got this lunch box last fall during back to school. I attached the SU! designer paper with Modge Podge on both sides, and created my own chipboard letter by using the SU! letter as a template on the packing boards they include in their designer paper packs. I glued my papers to it using the MP and cut them out. Inside the lunch box are letter magnets I made using the Big Deal Alpha and Stayzon. My little's son is 4, so hopefully he will enjoy this. Since I have a little girl, I don't have a clue on what to make for little boys, I hope he likes this!
Thursday, March 1, 2007
Spring Catalog Promotion
It's the first day to order from the new Stampin' Up! Spring Catalog, and as always SU! has a great deal for you! From now until the end of March, when you purchase the Polka Dot & Paisley Package totaling $34.95, you can get ANY additional item from the Spring Mini Catalog at 50% off! The Polka Dots & Paisley Bundle includes:
- Polka Dots & Paisley stamp set
- Petals Jumbo wheel
- Petals & Paisley Designer Series Paper
This card made with the adorable new Polka Dot & Paisley stamp set! Check out pages 8&9 of the new catalog for the great items in the bundle!
Wednesday, February 28, 2007
Blurred Vision
This is the EASIEST watercoloring technique ever! Everyone can do it. Simply stamp your image just like you always would, and then take your aquapainter and run it along the stamped edges. The ink will run a little, smoothing the color and blurring the lines. Very easy and very pretty! If you don't have an aquapainter, just use a regular small paint brush or even a wet Qtip.
I first stamped French Script in Creamy Caramel on Very Vanilla paper. I then ran my aqua painter over the entire paper, saturating it. Next, stamp the same stamp in Close to Cocoa over the paper while the paper is still wet. The water does all the work for you! Finally, I ran my Creamy Caramel stamp pad over the edges of the paper and...voila'!
Welcome!
Thanks!
Kristin
Christmas tags with SOC!
Hi all! It’s the crazy holiday season but you still need to create! Join us for Sisterhood of Crafters challenge this time around. It’s an...
-
I am SO excited to be a part of this blog hop celebrating the newest Paper Crafts Magazine issue, 350 Cards and Gifts! I was so surprized ...
-
Exciting GIVEAWAYS and Hop party for Simon Says Stamp’s STAMPtember event! Hi all! I am so excited to be a part of Simon Says Stamps’ STAMPt...
-
Happy Holidays Blog Hop Peeps! I can't believe it's already December! ....where does the time go?.... It's an exciting month ...