Wednesday, June 26, 2024

Sisterhood of Crafters challenge with Simon Says Stamp and Altenew!

 Sisterhood of Crafters challenge with Simon Says Stamp and Altenew!

Hi all!

It's time for another challenge with Sisterhood of Crafters!  This time we are working with what's in your GARDEN.  If you're anything like me, you have a bazillion things that are floral, so this should be an easy peezy challenge for you to join us on!

I've had the amazing opportunities to be a guest designer for Altenew and Simon Says Stamp this last year!  This card is one I made for my SSS spot, but added in some new Altenew items with it as well.  Both items are available at Simon Says Stamp...its a fabulous woman owned and run business here in Ohio and ships all over the world.  They literally have EVERYTHING so be sure to stop by and check out what they have!


The front panel features a recent release from SSS called Celebrate.  This is from their Just A Note stamp set which was designed by Cathy Zeliske.  There are a great set of coordinating dies, and not card type stamps to go with this set.  This card uses her Noted Tag stamp and die set with it.  They are great for any reason...teacher cards would be fantastic with it don't you think?  


The note cards were stamped with Altenew's Sea Glass ink with the sentiment stamped with their Obsidian ink.  The garden element features a part of Altenew's Dynamic Duo stencil set Painted Blossoms.  It has sentiment stamps and a die set that coordinates with it.  They're Dynamic Duo sets are my favorite subscription they have, pretty and affordable!  The inks are from their Maritan Terrian and Green Meadows ink sets.  


After stenciling a background panel, the tags were laid out and flipped over face down.  Adhesive foam was added only to the front tag, around the edges of the back tag.  That way the back tag can be slid out to reveal the added sentiment!  It's a fun and easy interactive element to add to a card.  Pink velvet ribbon is a soft and perfect addition to the tags.  Finally, a few yellow enamel dots were added to add some shine.

That's it!  Now lets see your GARDEN themed cards and share them in our gallery.  Have a colorful day!


Friday, June 21, 2024

Hello from CAS on Friday and ALEX SIBERIA

 Hello from CAS on Friday and THE TON

Hi all!

I hope you are staying cool so far this summer...I know!  Head into your craftin' space and join us for our CAS on Friday challenge this go around!  This time, we are asking for Clean And Simple cards based on nature.  Since I'm a flower kinda girl, I went for the obvious...


This stamp set from Alex Siberia is so lovely!  The open tulip just looks so graceful and regal, don't you think?

The tulip was first stenciled with the Pink Pearl, Blush and Coral Bliss for the bloom. Then the stem was inked with Dew Drops, Bamboo and Parrot inks, all from Altenew.
 

The outline of the tulip was stamped with gold pigment ink.  It was then heat set in luo of using embossing powder, to keep the image as simple and graceful as possible.  Just a touch of gold was perfection!  The sentiment strip is also from Altenew and was found in the sentiment scrap bin.  The card was then finished with gold enamel dots.  Perfect CAS!

Now go stay cool...grab some stamps...grab some inks and join us in this challenge!  Have a colorful day!


Tuesday, June 18, 2024

Altenew's GORGEOUS Rustic Rose and Burlap!

BetterPress and Watercoloring with Altenew's Rustic Rose and Burlap!

Hi all!

It's been a hot minute since I've posted something on the same day...life is hectic with the unexpected addition of our 19 month old Goddaughter and juggling the logistics of the Child Welfare system.  They certainly keep one jumping through hoops.  We've also added 2 brand new kittens into the house, so to say there is chaos is an understatement!  I've made the commitment to be in the studio daily from 9-1pm for some me time to lower stress...and it's been lovely being out here in the peace an quiet!  It's been only 2 day so far, but I'm on a roll!

I'm joining in the Time Out challenge this week with this quote:

Being a former art teacher, I love quotes from artists...I feel they are very insightful.  This card starts with a yellow back panel which was run through my BetterPress system with Altenew's Rustic Burlap plate.  It was inked with Altenew's Sunray Fresh Dye ink, which works wonderfully with the BetterPress plates.

Next, the Rustic Rose stamp was heat embossed with white powder on watercolor paper.  The image was painted with layers of watercolor to give the flower depth and dimension.  The process was repeated with the little sprig with purple flowers.  The stamped images were die cut and the edges were colored with Altenew's Dew Drop Alcohol marker.


Finally, the sentiment from the stamp set, was also heat embossed on vellum paper and die cut with Altenew's Halftone Circle dies.  Placement of the sprig went behind the vellum to make it peek out so you kind of have to look for it...hence the quote!  The rose was placed in the front for a huge pop of color and white enamel dots to finish off the card.

That's it for today!  I hope to be posting more often now that I have a 'work schedule' in the studio.  

Have a colorful day!

Wednesday, June 12, 2024

Wedding Card with Sisterhood of Crafters and SPELLBINDERS!

Wedding Card with Sisterhood of Crafters and SPELLBINDERS!

Hi all!

It's another challenge with Sisterhood of Crafters!  This time, we are focusing on WEDDINGS.  It is the season for weddings after all.  I was an event designer and florist for over 15 years in my misspent youth...lots of LONG hours and hard physical labor.  It was completely worth it!  I loved doing the work and still do it on occasion for friends and family.


For this card today, I used a recent Spellbinders Better Press product from my guest designer spot in May.  Its called Arched Messages.  This card was inspired by an event I did 10 years ago when we hung various LONG panels of silver paper from the ceiling for an event.  It was so pretty and elegant. 


The arches were added some with inks, some were heat embossed and some were added just for the texture.  I then used an arched die set to add the panel of silver glitter paper for some sparkle.  It didn't photograph as well as I had hoped...it's really pretty in person! 


The sentiment was added with silver embossing powder then die cut as well with a silver glitter shadow.  Finally, adorable enamel dots, some even in the shape of hearts for some extra love!  Now let's see your wedding cards, be sure to share them in our gallery!

Have a colorful day!

Sunday, June 9, 2024

Another EASY CAS card with AAA Cards challenge!

 Another EASY CAS card with AAA Cards challenge!

Hi all!

I’m here with another EASY card with AAA Cards challenge!  This challenge is anything goes but has a masculine twist.

This is another card I created using items from my scrap bins.  This time items were pulled from the panels and stamped images bins.

I will be using this card for my hubbies birthday for sure since we have a similar car in the same colors.  This stamped image is an old one from PaperTrey Inks and it’s been in the bin a LONG time.  It was time it saw the light of day!


The panel was cut to add a little interest to the card without distracting from the main image.  An inked shape would have been great too.  


Finally, a sassy sentiment and some enamel dots were added to finish it off!  See what I mean by easy!  It couldn’t be easier than this card.


Now let’s see what you can create for us!  Be sure to add your work to our gallery!

Have a colorful day!


Friday, June 7, 2024

EASY CAS on Friday Embossing Challenge!

 EASY CAS on Friday Embossing Challenge!

Hi all!

It's time for another challenge with CAS on Friday!  For our challenge this time, you need to do some EMBOSSING.  Heat embossing or emboss with a folder or ANY other means you choose!  Your creation just needs to include some type of embossing.

I used my trusty ole' scrap bins again for this challenge.  I tend to make multiples of everything when I'm creating, and if they don't end up on a card, then into the scrap bins they go.  I have 4 bins, geometric shapes and frames, sentiments, floral or stamped items, and background panels.  It's so easy to put together cards with these bins when life is crazy.

The monstera leaf was created a year ago when I was applying for DT positions...it didn't make the cut then.  It is so cute and it caught my eye so that was my starting point.  Next, the background panels.  The bin has stamped, embossed, painted, die cut, etc....pieces of crd base panels in it.  This is one from an Altenew virtual card class from November.  As I'm looking at it...I'm realizing I've attached it to my card on the wrong side...*sigh*. 

The sentiment was created in bulk when I was a guest designer with Altenew in March.  It's from a fantastic sentiment stamp set called Classic Greetings.  Highly recommend!  Then I added 3 little enamel dots in matching colors and 'perfecto'!  A CAS card is that easy!  Won't you try my fool-proof easy CAS formula?  If you do, be sure to share them with us in our gallery!

Have a colorful day!

Thursday, June 6, 2024

Tic Tac Toe Guest Designer

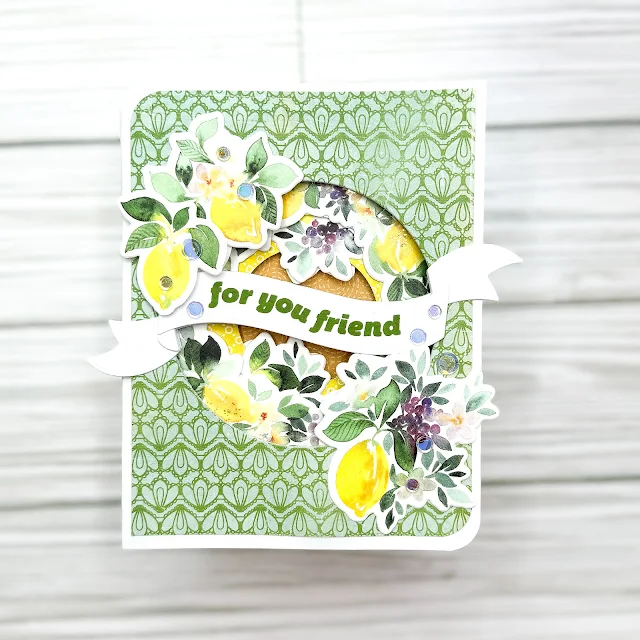
 Trying something NEW with Pinkfresh Washi!

Hi all!

I'm excited to share that I'm the guest designer again this week at the Tic Tac Toe Challenge!  I love their challenges, so many different ways to participate to fit any designer's style.  Check out the challenge board and see what you can create!

I chose to go down the left side; layers, die cuts, and patterned papers.  It also fits in the diagonal right to left, with layers, fun fold and gems too!

This card is made of 3 card bases, 5 pieces of patterned paper, and 2 strips of Lemons and Blueberries washi tape.  

The card bases were assembled together accordion style.  Then the patterned papers were placed on the sides that would be visible.  The hard part was die-cutting through all the layers of card stock!  Altenew's Halftone Circle die set was used for the graduated die cuts, using a smaller die for each layer.  That way you can see all the way through to the last page of the card.

Then came the fun part...decorating!  The sentiment banner is from The Stamp Market along with the sentiment stamps.  Each layer of the card has the banners placed in the same location.  The trick to do it was that the back side of the banner was stamped on for 2 of the strips so you wouldn't see it from the front of the card....that took a while to figure out!  

Next, the washi die cuts were added ensuring the back sides were covered by die cuts on the front side.  Does that make sense?  Once it was completed, the gems were added to the front, but glitter glue was used for the inside to add sparkle and the card would still lay flat.

So that's it for me!  I hope you'll join the Tic Tac Toe challenge this week, its a great board!

Have a colorful day!

AAA Cards FOLLOW THE LEADER Challenge!

 AAA Cards FOLLOW THE LEADER Challenge! Hi all! It’s time for a new challenge at AAA Cards !  This time we are CASE-ing one of our fellow DT...