Tuesday, October 26, 2010

Just like old times...

With hubby and baby away, it's been like old times here with Lily and I.  She is really enjoying the 1 on 1 attention, and I'm enjoying the peace and quiet!  Don't get me wrong, I adore my baby, but a break from the constant sibling bickering is a treat!  We'll be seeing them on Friday when we get to Disney World.  I've been getting all kinds of treats ready for all the kids on the trip, and I'll be showing you them later this week and next.
For now, here is another item I had submitted to Paper Crafts for their last call.  It wasn't accepted, but so many others were, so I'm not complaining.  It's just a cute little favor made for homemade candies.  Again with pink - my favorite!

Monday, October 25, 2010

WOW!!!

What a fabulous day!  First, tomorrow my hubby and toddler leave for Florida in the am...ahh I can sense the calm in my house now...  My PTO meeting went well, as it's been surrounded with controversy...it's like high school, who'd a thunk... and I received notice that Paper Crafts accepted 6, yes 6 of my current submissions!  I did the happy dance on the table with that one! ...just like college...
Here is one of the items that wasn't accepted for this call.  It's a home decor item for a baby's room.  I picked these colors, not only because I have girls, but because it matches my daughter's room.  I love pink!

Friday, October 22, 2010

Celebrate Chicky!

So during my daily inspiration from various blogs, I was introduced to Pam Wilson at Chicks of a Feather.  The fabulous Dawn McVey mentioned Pam on her blog My Favorite Things, so I of course had to check it out.  I love to see what other creative ladies are doing out there and send them my love, and she happens to be a fellow Buckeye!  This is her 1 year blog-aversary so why don't you go and give her some lovin'...she also has a giveaway happening....  In honor of her event, here is a Party Chicky for her!

Thursday, October 21, 2010

Getting ready...

How cute is this image?  I found it on scrapologie.blog.com.  While Ranjini no longer has an online store, she posts beautiful vintage items on her blog to share.  I really liked the image, but I don't think I've done it justice.  I'm still trying to get my paper mojo back.  But it makes me excited to see Cinderella in 8 days!!!


Wednesday, October 20, 2010

This is a card I made for the Paper Crafts World Card Making Day Card Contest.  I didn't send it in.  I like the color combination, but it just didn't come together like I wanted it to.


Monday, October 18, 2010

I was very busy on World Card Making Day, October 2nd.  I was having al kinds of creating fun!  This is a card I created for one of my neighbors, she is pregnant with a little girl.  She is buying my 4 poster crib for her new little one, which means I need to get on the ball with getting Elizabeth into her big girl room.  Katie is due after the first of the year!  I've gotten her an ADORABLE pettiskirt for the baby too.  I can't wait to give it to her!

Saturday, October 16, 2010

Hello?

*tap*tap*tap*  Anyone there?  I know I've left you all hanging.  I'm so sorry...it's my ADD kicking in.  I've been meaning to write.  Lots of exciting things have been happening here! 

First, My first EVER published card appeared on the pages of Paper Crafts Magazine this month, as well as a gift item!  I was SO incredibly excited and honored! There is nothing more thrilling than seeing your creation in the glossy pages of a magazine! My card (page 78) helped me win the Seasons Greetings category for the Stampin' Royalty Contest this year, as well as the Gold Medal Winner for the Olympics of Stampin Moxie Fab contest.  You will also see what I look like...or did 30 lbs ago... as they had the winners photos listed on page 14.
The second item that I have in this issue is on page 60, a new years wine bottle gift.  I made it to match this invitation and party 'hat'.  I loved this little collection, and am thrilled that even a part of it made it!  This was also featured yesterday on Moxie Fab - check it out!

Second, I have been very busy trying to loose weight.  I joined Jenny Craig to help me and it has been a blessing!  I'm kicking butt - and have lost 30 lbs in 7 weeks!!!   I work out 4 days a week, heavy cardio and toning.  I'm loving that my clothes are looser and that I'm fitting into some things I haven't worn in years!  I still have 50 lbs to go, and with the holidays approaching I want to be focused and determined to stay on track.

Finally, I have also been very busy with creating!  Not only items for publications, but for our upcomming trip to Disney World!  I am currently planning the Kramer Family Disney Grand Gathering that begins October 29th.  My entire family will be going, mom, dad, sister, brother, nephew and us.  It's only 9 people, but its up to me to make it magical for everyone!  We planned this vacation around my nephew Casey's birthday.  It's a difficult time for my brother, he celebrates his son, but it also reminds him of loosing his wife several days after he was born.  So we are taking them to the happiest place on earth to for some fun and to celebrate the other fall birthdays, Elizabeth's and my sister Karen's.  I have been planning our character meals, making maps, scavenger hunts, creating autograph books and making little bits of Tinkerbell magic to appear every day.  It's been a huge undertaking, and only because I'm making it so huge...ahh the life of a former event designer.

So, that's what I've been up to.  I'll be posting some projects not accepted for magazine publications, as well as some of the things I've been making for our trip in the upcoming days, so keep a look out for them!

Wednesday, September 8, 2010

what fun...

HHHUUUMMMM...I had scheduled this post for the 6th and it didn't go....HHHUUUMMMMMM....

I've told you beofre that I LOVE hot air balloons, right?  It's a good thing they are so hip and happenin' now... Here is a fun little card with what else...hot air balloons!  This is for this week's JUGs challenge.  I'ts been a while since I have been able to participate over there!  It's great challenge blog, the challenge types change very week, so it's always keeping you thinking!

*This photo was removed for publication*
Hot Air
Cardstock: (River Rock, Whisper White) SU!

Stamps…, clear: (Up, Up & Away) PTI
Ink…dye: (Soft Suede) SU!
Color media…markers: (River Rock, Certainly Celery, Bashful Blue) SU!; (Sea water & Silver) Smooch Spray; (Blue Skies, vintage green) Tattered Angels
Accent: (brown button)
Fibers: (natural burlap) Hobby Lobby
Dies: (balloons, clouds) PTI
Other: (hemp twine), (Corner Rounder) SU!
Instructions
1. Make card, round top right corner and set aside. Cut panel of Whisper White paper and round top right corner.
2. Die cut 4 large and 4 small cloud shapes and 1 large balloon shape.
3. Using 2 clouds at a time, mask cloud shapes and spray shimmer dye. Repeat with all clouds and color sprays.
4. Adhere burlap, twine and button.
5. Use markers to ink balloon image and stamp onto die shape. Adhere with foam dimensionals.
6. Stamp sentiment

Saturday, September 4, 2010

EEEKKK!

So, I was on a roll with my posts....What a fun and busy end of August!  Lily started 1st grade last week...I'm so old....she loves her new teacher and is starting to get back into the swing of school.  We planned and hosted our neighborhood block party and my in-laws last weekend, as well as hosted a Premier Jewelry Party for a friend.  I had over 130 people at my home over the course of 3 days...crazy....  I haven't had a minute of creating time in two weeks!  So I spent a few minutes on Monday with 2 cards for Paper Crafts last call.  They didn't get accepted, which I can understand...I did however get an item accepted to Cards Magazine, my first!  Go figure!  Here is one of the cards I've been able to create recently...
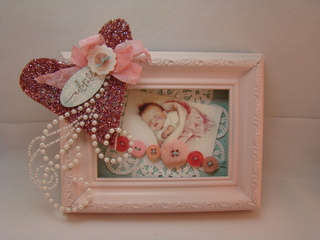
Birthday Texture
I created the patterned paper for this card with stamps!  I love that effect!

Cardstock: (River Rock, Baha Breeze, Whisper White) SU!

Stamps… clear: (Damask; Wood Grain) PTI; (French Script) SU! – SUBSTITUTION – PTI Script backgound
Ink…dye,: (River Rock, Baha Breeze, Pink Pirouette, Chocolate Chip) SU!
Ink… pigment: (White Craft ) SU!
Accent: (pearl buttons); (hand crafted pins using SU! Pretties Kit and pearl pins)
Fibers: (Pink lace ribbon) May Arts; (silver cording); (baby pink) Hug Snug
Tool: (zig zag rotary cutter) Purple Cow
Other: (item) MFR and/or source

Instructions
1. Make card, stamp wood grain background and set aside.
2. Cut Baha Breeze panel 3.5x 4.25”, distress stamp damask image. Distress edges with Baha Breeze and White craft inks. Cut zigzag across top.
3. Cut Whisper White paper 3.5x2, stamp script image and distress with River Rock Ink. Stamp sentiment. Sew onto Baha Breeze panel. Thread buttons onto silver cording and attach to Baha Breeze panel.
4. Adhere lace and panel to card.
5. Embellish with bow and button.

• To distress stamp, ink your image. Then gently press crinkled wax paper or a plastic bag onto the image then stamp.
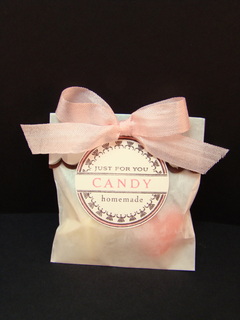
Wednesday, August 18, 2010

It's been a while...

since I made a card for the Moxie Fab Tuesday Trigger!  Actually, I have to admit I made this card about 2 weeks ago, but it matches this week's trigger with its colors and textures.  So it's not new to me (or maybe even Cath) but it is to you, so I thought I'd share.  I'll have an opportunity on Friday to get back into the 'spot' so perhaps I'll do another one...


Welcome Baby Bear
Cardstock: (Desert Coral Medium, Sage) Bazzil, (vellum paper) SU!

Patterned paper: (So saffron DSP) SU!
Stamps…rubber: (Short & Sweet) SU!
Ink…dye: (Soft Suede) SU!
Ink…pigment: (White) SU
Accent: (orange button);
Sticker: (Nutmeg chipboard stickers ) Cosmo Cricket
Fibers: (yellow embroidery floss) DMC; (1.25 striped grosgrain ribbon, So Saffron)SU!
Dies, embossing folders, brass templates: (Polka-dot) PTI; (houndstooth) Cuttlebug; (cookie cutters – largest circle) QuikCuts
Tool: (scallop border punch) SU!

Instructions
1. Make 4.25 square card; emboss with polkadots and set aside
2. Cut sage paper with die and emboss with houndstooth pattern. Rub gently with White craft ink – cut in half
3. Cut patterned paper 4.25 x 2 and attach to top of card, add a ¾” strip of vellum along the bottom, stamp sentiment. Adhere half scalloped circle below patterned paper.
4. Border punch a 4.24 x 2” piece of sage paper. Adhere to card with ribbon.
5. Embellish with chipboard stickers and button.

Monday, August 16, 2010

Do you need CPR?

Are you going into shock?
I TOLD you I wasn getting back into the swing of things!
One week from today, Lily is back in school and nap time is MY TIME again!
Here is a card I created for the 2S4U current challenge.  I always love the sketches Laura and Kazan come up with, fresh and lovely...This week's challenge is sponsored by AiFactory, I don't know much about it, but I'm heading right over after I finish this post!  I really excited about this card, I was able to use my NEW Copic markers from my PC Stampin' Royalty win for the first time...along with some of the others I picked up...How did I ever get by without them?  They are QUITE amazing!  It was very fun coloring this in, I think you'll see a lot more Copic work in future creations!

Dahlia Thanks
Cardstock: (Going Grey, Whisper White, Basic Black) SU!

Patterned paper: (Tiny Polka-dot white on black)TPS
Stamps clear: (Delightful Dahilias) PTI
Ink…pigment: (White)SU!
Embossing powder: (Winter White) SU!
Color media…markers: (YR07, R08, Y38, YR04, YR68) Copic, (Going Grey) SU!
Accent: (orange button)
Fibers: (grey embroidery floss) DMC
Tool: (border punch) Martha Stewart, (corner rounder) SU!; (dahlias die) PTI

Instructions
1. Cut card 3.5x5 from grey card stock and round the corners, set aside.
2. Cut black card stock 3 3/8x 4 7/8, scallop punch one short side. Adhere to card
3. Cut ½ strip of polka-dot paper, adhere to black paper.
4. Stamp and heat emboss sentiment above polka-dot strip.
5. Die cut flower in white paper, stamp and color. Adhere to card.
6. Add button embellishments

Saturday, August 14, 2010

Briar Rose

WOW!!!  5 posts in 4 days...I'm doin' good!  The girls are napping, Rob is relaxing and I'm gettin' crafty.  This card I made for the current ETSY Inspired Challenge.  I love ETSY and the retro items at LoverDover are down right adorable!  We have our fall trip to Disney planned, and she has some fantastic items I could pick up for my girls...
This card was inspired  by this dress.  For some reason it talked to me.  Not my typical asthetic...  This is what I created to pay homage to it.
Briar Rose
Cardstock: (Basic Black, Whisper White) SU!

Patterned paper: (Sweet as Cherry Pie) Websters Pages
Stamps…rubber: (Short & Sweet) SU!
Ink…dye: (Basic Black) SU!
Accent: (red, clear & black buttons) ; (black felt scallops) Narritives by Karen Russel Creative Imaginations
Fibers: (red and blue thread) Coats & Cutter
Dies, embossing folders, brass templates: (Swiss Dots) Cuttlebug; (labels 4) Spellbinders
Tool: (scallop border punch) SU!; (3/4” circle punch) SU!

Instructions
1. Make card and set aside.
2. Cut patterned paper and layer on white card stock. Stitch around the edge with a zig-zag stitch. Add black scallop ribbon and adhere to card
3. Dry emboss white card stock and use border punch along long edge. Adhere to assembled card
4. Cut vintage label from patterned paper and attach to card.
5. Die cut label and stamp with sentiment, attach to card.
6. Embellish buttons with paper and thread, attach to card with glue dots

Simple THX

Hello again!  Shocked to hear from me so soon?  ...I'm sure you are....  I've been neglectfull really.  Remember when I posted nearly 4 times or more a week?  Back when the baby wasn't walking, getting into EVERYthing, causing chaos...  But I'm trying get back to that.  Be patient with me.  Summer's almost over....
This is a card I made for the current Clean and Simple challenge 103.  I did change it up a little, I turned it and instead of a ribbon along the bottom of the center panel, I put my embellishment and sentiment there.  I thought it kept it even more simple, with just the embossed panel and simple stitching.  I love it!!
Simple TXH
Cardstock: (Great Lakes) Bazzil

Sticker: (letter stickers) American Crafts
Fibers: (Fucia felt) Hobby Lobby; (green/white polka dot ribbon) no vendor {purchased at Flower Factory}; (green thread) Coats & Cutter
Dies, embossing folders, brass templates: (Polka dots) PTI

Instructions
1. Make card and set aside.
2. Emboss 3.5x4.75” panel of same card stock and stitch the edges with green thread. Adhere to card
3. Add letter stickers for sentiment
4. Adhere a homemade flower embellishment with ribbon leaf.

Thursday, August 12, 2010

{Heart} U

I have to say I really like this card.  It's cute with a touch of 'masculinity'...spell check...  A perfect card for the perfect hubby.  This is a card for the current City Crafter Challenge.  I just found this challenge blog, and now that summer is winding down, I am finding time to get crafty!  Why does summer seem to be busier than the school year?  I'm only down in the craft'n spot when there's laundry to do, and since I avoid laundry at all costs....

{Heart} U
Cardstock: (Chocolate Chip, Blushing Bride and Baha Breeze) SU!

Stamp Set: (Wood Grain) PTI
Ink: (Craft White and Classic Soft Suede) SU!
Accessories: (pink and brown buttons and hemp twine) no vendor; (brown velvet ribbon) May Arts; (white string for hand made crocheted heart)can use white embroidery floss; (woodgrain embossing plate) PTI; (chipboard letter) SU!; (corner Rounder) SU!;

Etsy inspired

I really need to update my Etsy shop. 
It's shamefull really. 
I have no excuse. 
Do you Etsy?
You should.
There are SO many wonderful artists out there.
Unique pieces of deliciousness for anyone to pick up.
As a fine arts major, I covet nearly everything there.
These cards were inspired by the fabulous Cathy Walter's creations.  She has beautiful pendants like this one, which got me to whip out my PTI Up Up and Away set.  These are for a challenge going on at Etsy Inspired Challenge blog.  It is the 100th challenge, quite a feat!  Go over there, check out the creations, then head over to Etsy and get yourself some art.  Go on now...go...

Yellow clouds?

I'm doing another challenge...are you shocked?  I know my craftin' space is.  This is the most action it's seen all summer!  Ahhh...less than 2 weeks until school starts...no more craziness during the day....ahhhhhhh
This is a card I made for another new challenge blog to me, Pals Paper Arts.  It's run by a talented group of ladies, that are...surprize...SU! Demonstrators!  Now that I've re-joined the SU! ranks, this is a blog to check out all the new things SU has to offer.  Here's my creation for this challenge.  It's not made with SU! stamps, but it is made with some of their inks.  Simple and cute!

Saturday, July 31, 2010

OMG!

I had several posts that were saved and pre-scheduled to post this week.  And they didn't.  Huummmm....  Is it program error or programmer error?  obviously the latter...    Have you seen the challenges Cath has happening over at Moxie Fab??  SO many going on.  Too much fun!  This is one I created for the Moxie Fab Shabby & Vintage challenge.  The colors are a bit un-orthodox, but I really liked how it turned out! 


I'll have to give this one to my DH, he's the best!  He has had the last 4 days off and it's been a real joy just hangin' out with him and the girls.  No house projects this week...shocker...

Cherish U
Card Stock: (Riding Hood Red, So Saffron, Certianly Celery, Very Vanilla) SU!

Stamp Set: (Warm Words) SU! - retired
Printed Papers: (Websters Pages) Sweet as Cherry Pie, (Websters Pages) Days of the Week Journaling Cards– Happy Neutrals
Ink: (Soft Suede) SU!
Accessories: (red Glitter) retired SU! – can substitute Martha Stewart red glitter; (scalloped square) Nestabilities; ((aqua blue Hug Snug) Lawrence Schiff Silk Mills; (pink and blue button); (Swiss Dot embossing folder) Cuttlebug; (dots embossing plate) PTI; (chipboard letter)SU!; (vintage green) Tattered Angels glitter spray

Sunday, July 25, 2010

Here is another card for some current magazine calls out there.  It was my least favorite I made, but I liked the pannel with the rhinestones. 


Rhinestone Love


Cardstock: (Going Grey, whisper white; real red) SU!
Accessories: (star dust)Stickles; (red rhinestones) Kasier Craft; (corner punch) SU!; (White Hug Snug) Lawrence Schiff Silk Mills; (‘love’ rub-on) American Crafts; (embossing folder) Cuttlebug

Instructions:

1. Make card and set aside
2. Cut panel from Whisper White cardstock; emboss with folder. Punch corners with corner rounder and embellish with Stickles and red rhinestones. Layer on Real Red cardstock.
3. Tie seam binding ribbon along side of card and add rub-on.
4. Adhere panel and bow.

Saturday, July 24, 2010

I can't wait...

...to get life back to normal!  I've almost finished tackling the mountain of laundry, cleaning the house and getting ready for our next vacation; between chasing, feeding, cleaning and entertaining the girls.  It's hotter than Hades in central Ohio - 95 and 100% humidity...ick.  Is this the time of the year parents start wishing for school to start....'cause I'm ready.  **sigh**
My only escape is my crafting room, that has long been neglected.  Then only time I can get in there is after the kids get to bed, and then I'm too hot and tired to get creative.  Oh well!  Here is something I created during one of my non-creative moments...


It's Valentine's day in the publication world, hence the theme of this card.  It is my attempt at a masculine card...

Felt Love
Cardstock: (Going Grey, Blushing Bride, whisper white) SU!
Stamp Set: (Damask- sentiment) PTI
Printed Papers: (Oliver and Olivia) Basic Grey
Ink: (Craft White and Classic Going Grey) SU!
Marker: (Going Grey) SU!
Accessories: (heather grey felt)Hobby Lobby; (grey buttons) no vendor; (border punch) Fiskers; (Labels die) Nestabilities; (Pink thread) Coats & Clark; (wood grain embossing plate)PTI

Instructions:
1. Make card and set aside
2. Cut 4 1/8 ” x 5 3/8” panel from Going Grey cardstock; emboss with wood grain plate. Punch bottom edge with border punch. Add strip of Blusing Bride along the bottom from behind.
3. Die cut heather grey felt and white cardstock with labels nestabilities. Stamp with sentiment and trace edge with marker.
4. Sew paper and button to felt. Adhere to card panel.
5. Sew buttons to the bottom of the panel and add to card base

Tuesday, July 20, 2010

Hello stranger...

It's me....I'm sorry I've neglected you....I've been away....on vacation....at the beach.....and I left my mind buried in the sand...along with about 10 golf balls.  But now I'm back.  Are you glad to see me?  I am heading to my craft room as we speak.  I PROMISE to have many creations here for you very soon. 
Until then, let me bore you with a photo montage of my trip to Petoskey.  The weather was perfection, it almost made me want to move there....almost ;).  We did promise that if we ever won the lottery, we would get a summer place there.  Ahh to dream....

While driving nearly 8 hours up to our golf/family vacation, we spotted this HUGE golf ball being transported somewhere.  We had hoped it would be an omen for a good golf trip...


...but we were wrong.  We played up at Boyne Highlands north of Petoskey. We were able to play 4 times, which is unheard of in our lives... it had been nearly 3 years since I picked up a club.  Golf is like a bike though, even if you haven't ridden in a while, you don't forget the basics.  you won't play well, but you know the basics. This is one of the holes at the Moor, this course was long but not to difficult.  The Ross on the other hand....

was VERY difficult.  Every hole on the front 9 was surrounded by sand bunkers.  On the back nine, it was like Long Boat Key...sand on both sides.  I spent more time in the sand there than when we went to the beach.  Some of the bunkers were like St. Andrews...deep and hard to get out of....5 stokes on one of them...ri-donk-u-lous!  This is a photo of a short par 3 on the course, and there are 2 more bunkers on the other side of the green you can't see here... aren't par 3's supossed to be easy? Crazy.  This is the only hole I made par on the 1st day....I did say it had been 3 years right? 

Surprize!  We found this one hidden in the woods off the course.  We were desperate!

After our fantastic - short - kid free 2 days, we went to the in-laws to hang out with the family.  Here is ny husband teaching my daugher it's ok to put plastic bags on our heads....I was APPAULED when I saw these in the camera.


Then we took the girls to the beach on Little Traverse Bay.  I had never expected to see waves so large there, they were almost as big as the gulf!  We all had tons of fun!
It was a rough 9 hour ride home...very rough.  I'm glad to be home and ready to focus on something new, other than packing and cleaning.  We don't leave for another 2 weeks for our next excursion to Detroit... an exciting vacation spot.
I'll be sure to have things planned this time before I leave so I can have pre-planned posts.  I hope you are all having a fun filled summer like we are!  Filled with sun, fun and the occasional crazy experience!